Genome Editing of Human Pluripotent Stem Cells Using the ArciTect™ CRISPR-Cas9 System
- Document # 27084
- Version 3.0.2
- Jun 2023
Introduction
The ability of human embryonic stem (ES) and induced pluripotent stem (iPS) cells to self-renew indefinitely and differentiate into all somatic cell types makes them an attractive source of human tissue for regenerative medicine. This potential, combined with recent advances in more efficient and accessible genome editing techniques, has opened the door to a wide range of research areas. Disease-causing mutations can now be introduced or corrected in cell lines to create or rescue disease models; work in this area may also pave the way to correcting disease-causing mutations in vivo.
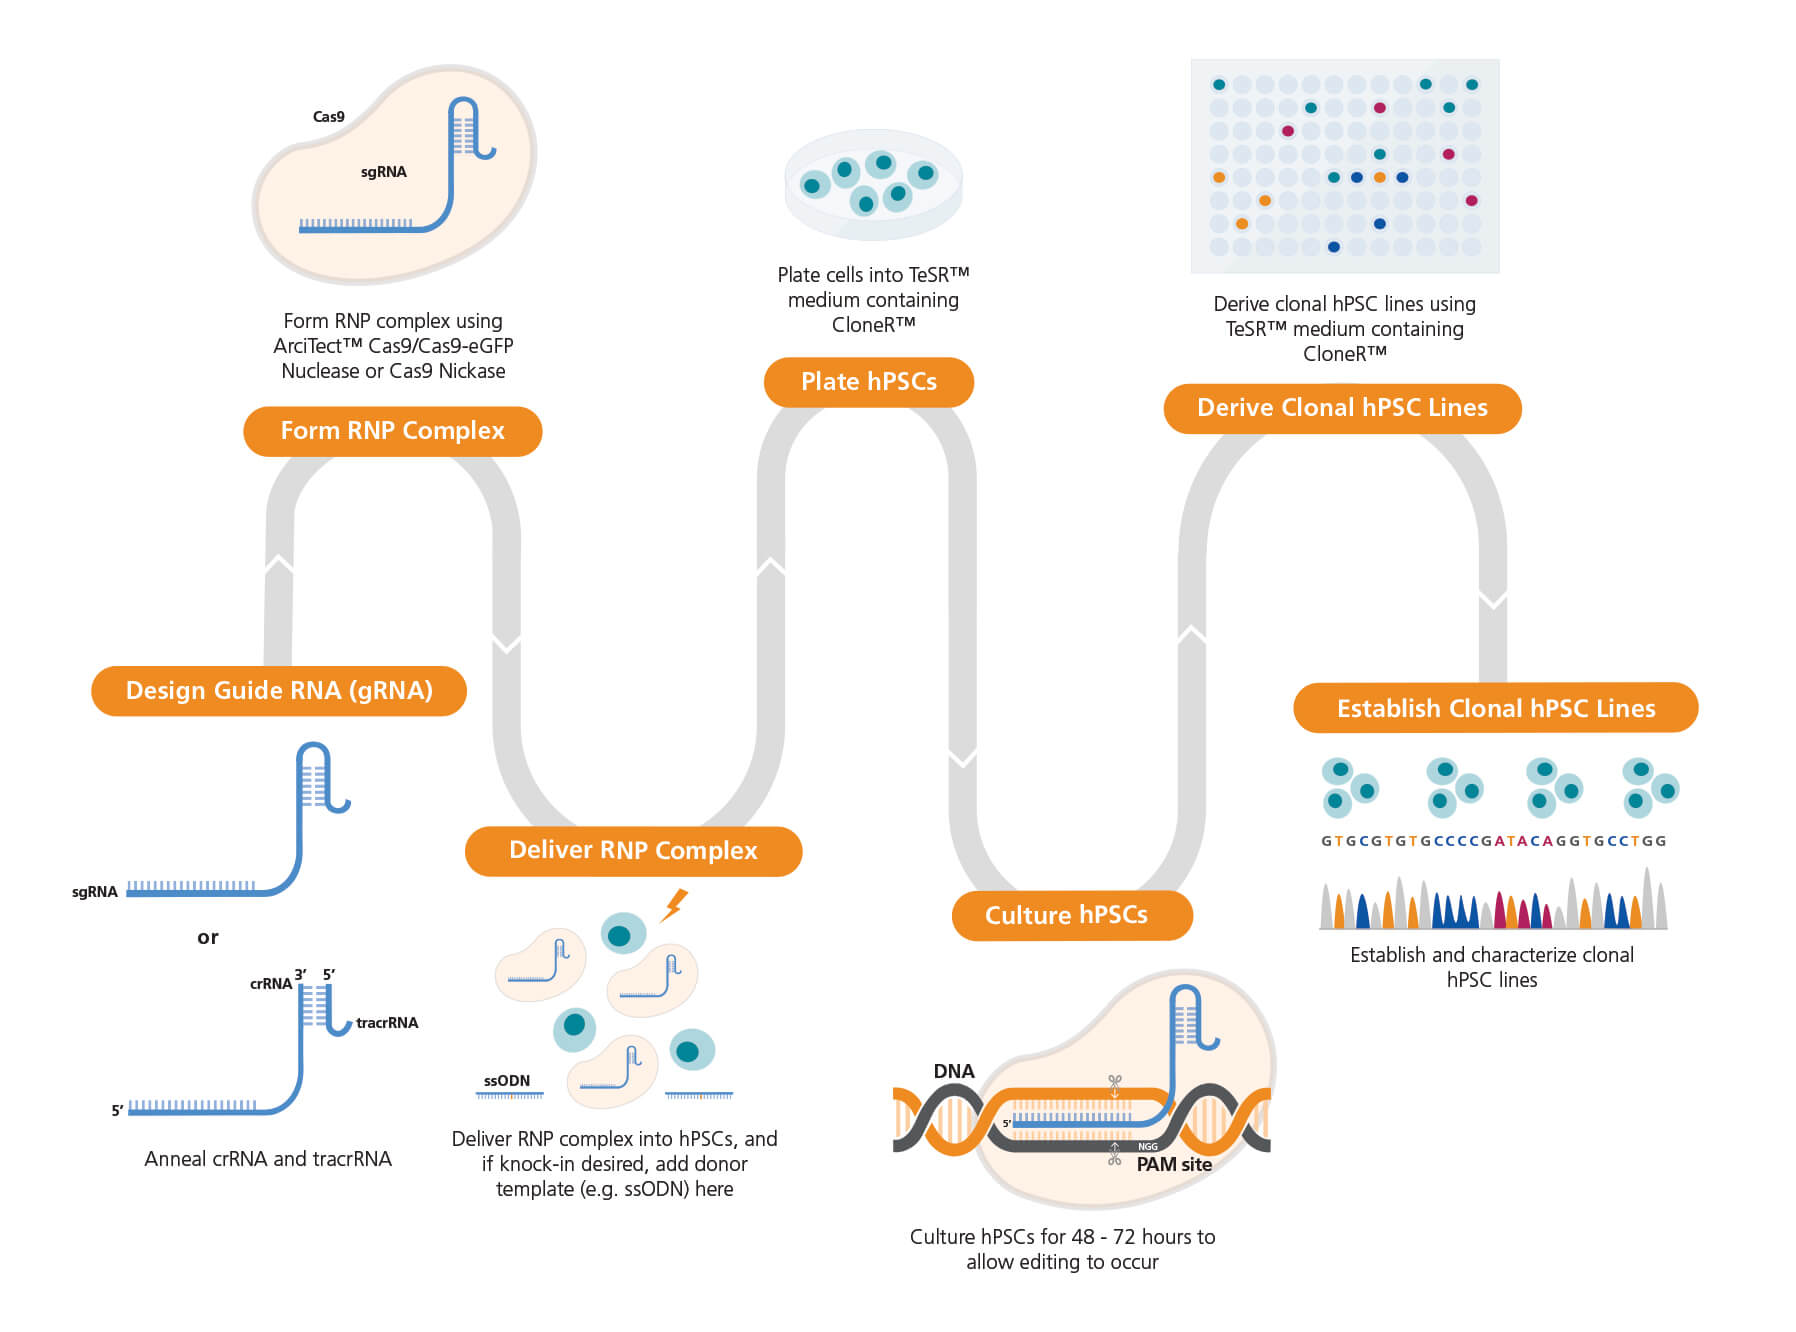
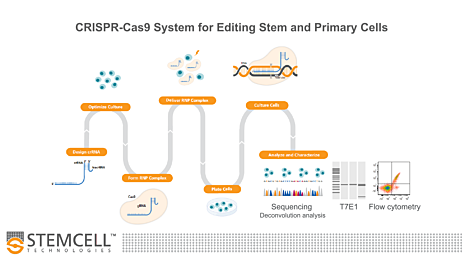
Figure 1. Experimental Workflow for Human Pluripotent Stem Cell (hPSC) Genome Editing
The guide RNA (gRNA) sequence is designed once a target locus for editing is identified. ArciTect™ single guide RNA (sgRNA) or CRISPR RNA (crRNA) can be designed using STEMCELL’s CRISPR Design Tool. The ArciTect™ CRISPR-Cas9 ribonucleoprotein (RNP) complex is then prepared and delivered into hPSCs in single-cell suspension using transfection or electroporation with or without addition of a donor DNA template (e.g. single-stranded oligodeoxynucleotide [ssODN]). Cells are then plated in hPSC maintenance medium (mTeSR™1 or mTeSR™ Plus) supplemented with CloneR™, to enhance survival of hPSCs plated as single cells. Editing efficiency can be analyzed after 48 - 72 hours using ArciTect™ T7 Endonuclease I Kit (Catalog #76021), via sequencing-based approaches, or by flow cytometry, if the experimental design permits. If generating clonal cell lines is desired, this can be accomplished by limited dilution cloning using mTeSR™1 (Catalog #85850) or mTeSR™ Plus (Catalog #05825) supplemented with CloneR™ (Catalog #05888). Editing efficiency measurements can be used to inform the approximate number of clones for further characterization using sequencing-based approaches.
Design of a CRISPR-Cas9 genome editing experiment is dependent on the experimental goal. If the goal is to understand the general role of a gene in disease, a knockout model is a frequently used approach. Alternatively, one can introduce precise DNA changes that incorporate a single nucleotide variant, genetic “tags”, or transgenes into the genome. These two approaches both require a CRISPR-associated endonuclease protein (i.e. Streptococcus pyogenes Cas9, or SpCas9) and a custom-designed guide RNA (gRNA). The gRNA functions to target Cas9 to the genome and can be sourced as either a two-part system where ArciTect™ crRNA and ArciTect™ tracrRNA are preannealed to form crRNA:tracrRNA duplexes prior to complexing with Cas9, or as a single guide RNA (sgRNA). Both custom sgRNA and custom crRNA can be designed using STEMCELL’s CRISPR Design Tool. Precise (knock-in) editing also requires the addition of a donor DNA template to instruct the cell on the specific genetic changes you wish to incorporate. The exogenous DNA is targeted to the site of interest through incorporation of homologous sequences (also known as homology arms) that flank the target site and can be used as a donor template for repair following Cas9-mediated DNA break formation. This type of experimental approach relies on the homology-directed repair (HDR) pathway, which functions through homologous recombination to incorporate the exogenous sequence at the cleavage site. This is a particularly powerful approach, as it enables researchers to “re-write” the genome in a targeted and specific manner.
The following protocol provides tips for gRNA and donor template design, instructions for the preparation of CRISPR-Cas9 ribonucleoprotein (RNP) complexes, and their transfection into ES or iPS cells via electroporation and using the Mirus TransIT®-X2 System. We also provide recommendations for knock-in using a single-stranded oligodeoxynucleotide (ssODN) donor DNA template. In each protocol, the materials required are indicated on a per-well basis. These values will need to be scaled up for the actual number of wells in an experiment. It is recommended that each unique single guide RNA (sgRNA) or CRISPR RNA (crRNA) be tested in duplicate wells. Multiple sgRNAs or crRNAs are also often tested when a new gene is being targeted, as they will have different efficiencies at the target gene and at off-target sites. Optimization of conditions such as cell density or Cas9:guide RNA ratio may be desired for some difficult-to-transfect cell lines or refractory genomic locations.
For best results, starting hPSC cultures should be of high quality and moderate density, and largely free from differentiated areas. For complete instructions on culturing high-quality ES and iPS cells, including coating plates and use of (Catalog #85850) or (Catalog #05825), refer to the Technical Manual: Maintenance of Human Pluripotent Stem Cells in mTeSR™1 or mTeSR™ Plus.
This protocol uses (Catalog #05888), an mTeSR™1/mTeSR™ Plus supplement, which greatly enhances the cloning efficiency and single-cell survival of human pluripotent stem cells (hPSCs). For complete instructions on thawing, preparation, and storage of CloneR™, refer to the Product Information Sheet.
Preparation of ArciTect™ sgRNA Working Solution or ArciTect™ crRNA and ArciTect™ tracrRNA Stock Solutions
Materials Required
| Product | Catalog # |
|---|---|
|
ArciTect™ sgRNA* |
|
|
ArciTect™ crRNA* |
|
|
ArciTect™ tracrRNA |
|
|
Nuclease-free water |
*This product is only available in Australia, Austria, Belgium, Canada, China, Denmark, Finland, France, Germany, Iceland, Ireland, Luxembourg, the Netherlands, New Zealand, Norway, Poland, Portugal, Singapore, Spain, Sweden, Switzerland, the United Kingdom, and the United States.
- Briefly centrifuge the vials before opening.
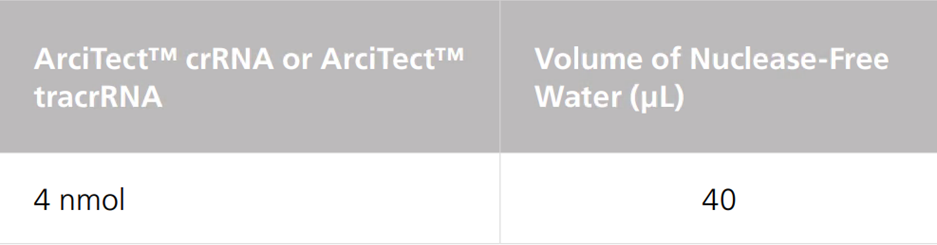
- Add nuclease-free water to give a final concentration of 200 μM crRNA and tracrRNA (Table 1) or 100 μM sgRNA (Table 2), as outlined below.
- Mix thoroughly. If not used immediately, aliquot and store at -20°C for up to 6 months or at -80°C for long-term storage. After thawing the aliquots, use immediately. Do not re-freeze.
Table 1. Resuspension Volumes for 200 μM* ArciTect™ crRNA or ArciTect™ tracrRNA
*200 μM is equal to 200 pmol/μL
Table 2. Resuspension Volume for 100 μM* ArciTect™ sgRNA
*100 μM is equal to 100 pmol/μL
Electroporation of Human ES and iPS Cells Using the Neon® Transfection System and Lonza® 4D-Nucleofector™ X Unit
Materials Required
| Product | Catalog # |
|---|---|
|
ArciTect™ sgRNA
|
|
|
ArciTect™ Cas9 Nuclease |
|
|
Single-stranded oligodeoxynucleotide (ssODN), 100 µM stock |
e.g. transOMIC |
|
Corning® Matrigel® hESC-Qualified Matrix |
Corning 354277 |
|
mTeSR™1 |
|
|
CloneR™ |
|
|
ACCUTASE™ |
|
|
Falcon® 24-Well Flat-Bottom Plate, Tissue Culture-Treated |
|
|
Neon® Transfection System 10 μL Kit
or P3 Primary Cell 4D-Nucleofector™ X Kit S
|
MPK1025 or Lonza V4XP-3032 |
|
DNase- and RNase-free microcentrifuge tubes |
|
|
Falcon® Conical Tubes, 15 mL |
|
|
Heating block or thermocycler |
--- |
A. Preparation of Tissue Culture Plates
The following protocol is for electroporation of human ES or iPS cells in a 24-well tissue culture plate. If using other cultureware, adjust volumes accordingly.
- Coat a 24-well plate with Matrigel® and bring to room temperature (15 - 25°C) for at least 30 minutes prior to use.
- Warm (15 - 25°C) sufficient volumes of mTeSR™1 or mTeSR™ Plus, CloneR™, and ACCUTASE™.
- Prepare 5 mL of Single-Cell Plating Medium per transfection
by adding CloneR™ to mTeSR™1 or mTeSR™ Plus at a 1 in 10
dilution.
Example: To prepare 10 mL of Single-Cell Plating Medium, add 1 mL of CloneR™ to 9 mL of mTeSR™1 or mTeSR™ Plus.
B. Annealing of crRNA:tracrRNA Duplexes
RNP complexes can be prepared using either two-part crRNA:tracrRNA duplexes, which require pre-annealing (see below), or sgRNA. If working with sgRNA, skip this section and continue to section C.
- Prepare 80 μM crRNA:tracrRNA by combining crRNA, tracrRNA, and Annealing Buffer in a PCR tube as indicated in Table 3. Mix thoroughly.
- In a thermocycler or heating block, incubate mixture at 95°C for 5 minutes followed by 60°C for 1 minute. Cool to room temperature (15 - 25°C) and place on ice. If not used immediately, store at -80°C for up to 6 months.
Table 3. Preparation of 80 μM (80 pmol/μL) crRNA:tracrRNA duplexes
C. Preparation of a Single-Cell Suspension
- Collect cells during their exponential growth phase.
- Use a microscope to visually identify regions of differentiation (if any) in the wells to be passaged. Mark these using a felt tip or lens marker on the bottom of the plate. Remove regions of differentiation by scraping with a pipette tip or by aspiration.
- Aspirate the remaining medium from the well and add 1 mL of ACCUTASE™ (for 6-well plate). Incubate the plate at 37°C and 5% CO2 for approximately 5 minutes, or until colonies appear to be dissociated.
- Add 2 mL mTeSR™1 or mTeSR™ Plus to each well. Using a pipettor fitted with a 1000 μL tip, gently wash the cells from the surface of the plate by spraying the solution directly onto the colonies. Pipette the suspension up and down 2 - 3 times to break up small aggregates into single cells.
- Transfer the cell suspension to a 15 mL conical tube.
- Centrifuge at 300 x g for 5 minutes.
- Aspirate the supernatant, being careful not to disturb the cell pellet.
- Resuspend cells in at least 2 mL of Single-Cell Plating Medium and mix by flicking the tube 2 - 3 times.
- Count cells using a hemocytometer or automated cell counter.
- Add 3 x 10⁵ cells to a new 15 mL conical tube for each electroporation condition. Centrifuge at 300 x g for 5 minutes.
- During centrifugation proceed immediately to section D.
D. Preparation of ArciTect™ CRISPR-Cas9 RNP Complex Mix for Electroporation
- To prepare the RNP Complex Mix, combine components in a microcentrifuge tube as indicated in Table 4. Adjust component volumes according to the desired number of transfections. Mix thoroughly.
- Incubate the RNP Complex Mix at room temperature (15 - 25°C) for 10 - 20 minutes.
- (Optional) Dilute 100 μM ssODN to 20 μM with Resuspension Buffer R (Neon® Electroporation) or P3 Primary Cell Nucleofector™ Solution with Supplement 1 (4D-Nucleofector™ X Electroporation) as indicated in Table 5.
- After the RNP complex is formed, add either 2.5μl of Dilluted ssODN or appropriate buffer per electroporation device, to each RNP Complex Mix prepared in step 2 (Table 4), according to Table 6.
Table 4. Preparation of RNP Complex Mix Using sgRNA or crRNA:tracrRNA
NOTE: May require optimization with different cell lines. A 1:2 to 1:8 molar ratio of Cas9 to gRNA is typically recommended.
Table 5. Preparation of Diluted ssODN
Table 6. Preparation of Complete RNP Complex Mix
E. Electroporation of Human ES or iPS Cells with RNP Complex
Perform electroporation using either the Neon® Transfection System (section a) or the Lonza® 4D-Nucleofector™ X Unit (section b). This can be performed using the sgRNA RNP complex or the crRNA:tracrRNA RNP complex prepared in section D.
a) Electroporation Using Neon® Transfection System
- Aspirate supernatant from the cell pellet prepared in section C.
- Resuspend 3 x 10⁵ cells in 7.5 μL of Resuspension Buffer R per
electroporation condition and pipette up down to mix.
Note:A range of 1 x 10⁵ to 1 x 10⁶ cells can be used per electroporation reaction. - Transfer 7.5 μL of the cell suspension to each 7.5 μL Complete RNP Complex (formed in section D step 4) and pipette up and down to mix.
- Using a 10 μL Neon® pipette tip, draw up 10 μL of the
mixture, check to see if the capillary is free of bubbles, and
place into the electroporation chamber containing 3 mL of
Electrolytic Buffer E.
NOTE: If air bubbles are present in the tip when the cells are electroporated, cell viability and transfection efficiency will be significantly reduced. - Electroporate the mixture using the settings in Table 6.
NOTE: Refer to the manufacturer’s instructions on electroporation. Electroporation conditions may require optimization for different cell lines.
Table 7. Recommended Electroporation Conditions for Human ES or iPS Cells Using a Neon® Transfection System
Note: Refer to the manufacturer’s instructions on electroporation. Electroporation conditions may require optimization for different cell lines.
b) Electroporation Using Lonza® 4D-Nucleofector™ X Unit
- Aspirate supernatant from the cell pellet prepared in section C.
- Resuspend 3 x 10⁵ cells in 17.5 μL of P3 Primary Cell
Nucleofector™ Solution + Supplement 1 per electroporation
condition and pipette up down to mix.
Note: A range of 1 x 10⁵ to 1 x 10⁶ cells can be used per electroporation reaction. - Transfer 17.5 μL of the cell suspension to each 7.5 μL RNP
Complex Mix (prepared in section D) and pipette up and down
gently to mix, trying not to form air bubbles.
Note: If air bubbles are present in the cuvette when the cells are electroporated, cell viability and transfection efficiency will be significantly reduced. - Transfer 20 μL of the cell suspension + RNP Complex Mix to one well of the 16-well Nucleocuvette™ Strip. Gently tap or use a pipette tip to ensure no air bubbles are present.
- Set the Lonza® 4D-Nucleofector™ X Unit to program code CA-137.
- Place the Nucleocuvette™Strip in the Shuttle device of the 4D-Nucleofector™ X Unit, select OK to load the strip, and select Start to begin electroporation.
F. Post-Editing Culture
- Immediately after electroporation, transfer cells to the warm (37°C) plate prepared in section A.
- Mix by gently rocking the plate back and forth 2 - 3 times.
- Incubate the plate at 37°C and 5% CO2.
- Perform a full medium change every 24 hours with 0.5 mL of room temperature (15 - 25°C) mTeSR™1 or mTeSR™ Plus.
- Incubate the cells for 48 - 72 hours (or up to 7 days if confluency is low) after transfection for genome editing to occur.
- Harvest cells for assessment of genome editing efficiency. Genomic DNA can be amplified by PCR using primers flanking the target region and (Catalog #76026), followed by sequencing of PCR products. Alternatively, (Catalog #76021) can be used to assess editing efficiency (% INDEL formation) following PCR amplification.
For further information, refer to the Technical Bulletin: Evaluation of Genome Editing.
Case Study: Knock-In Optimization Through GFP to BFP Conversion
To demonstrate genetic knockout and knock-in with the ArciTect™ CRISPR-Cas9 system, we targeted the enhanced green fluorescent protein (eGFP) locus in eGFP-tagged WLS-1C iPS and H1 ES cell lines. A single base substitution (196T>C) in the wild-type GFP sequence can shift fluorescence absorption and emission towards the blue spectrum, effectively converting GFP to blue fluorescent protein, or BFP.1 The conversion of GFP to BFP can be used for quantitative assessment of knockout (NHEJ) and knock-in (HDR) frequencies through measuring GFP and BFP fluorescence by flow cytometry.2 The loss of GFP expression indicates genetic knockout (NHEJ) and the conversion of GFP to BFP indicates genetic knock-in of the BFP sequence (Figure 2).
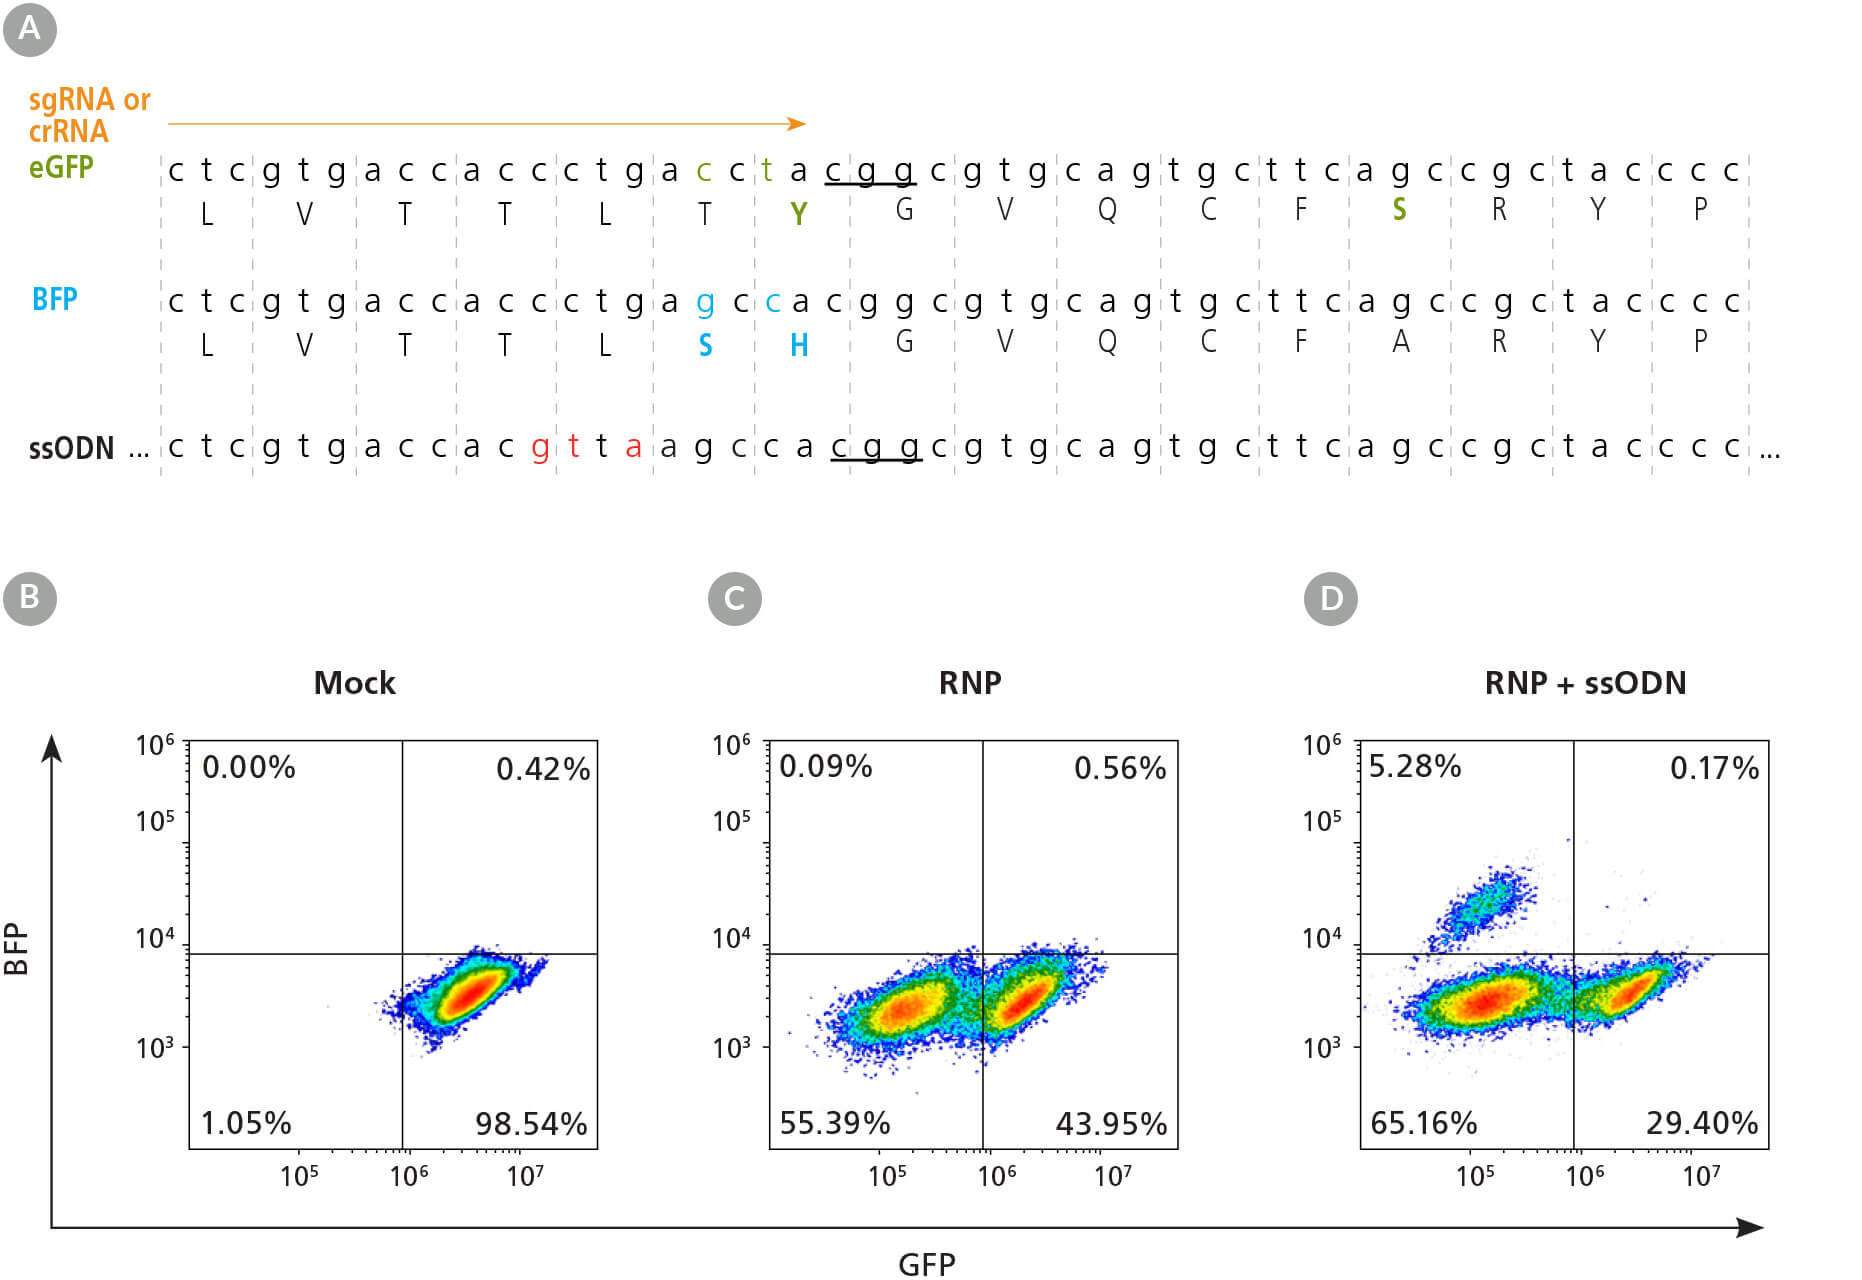
Figure 2. eGFP-Tagged hPSC Lines Enable Quantitative Assessment of CRISPR-Cas9 Editing Efficiency
(A) Schematic of the eGFP DNA and amino acid sequences, with critical GFP amino acid sequence indicated in green and BFP sequence differences indicated underneath in blue. The crRNA or sgRNA (orange arrow) and single-stranded oligodeoxynucleotide (ssODN) knock-in donor template are shown above and below the sequences, respectively. Ellipses before and after ssODN sequence represent homology arms of 120 base pairs (bp) upstream and 48 bp downstream flanking the PAM. The PAM sequence is underlined and silent mutations, to prevent gRNA reannealing and repeated cut-mutation cycles, are shown in red. (B - D) Representative dot plots of flow cytometry analysis from mock electroporated (B), RNP electroporated (C), and RNP + ssODN electroporated (D) 1C-eGFP hPSCs.
The efficiency of HDR-dependent knock-in editing is considerably lower than knockout since NHEJ is the primary repair pathway in mammalian cells. However, editing efficiency can be optimized through strategic design of both the gRNA and ssODN donor template. Editing efficiency is dependent on the cut-to-mutation distance.3 Since Cas9 cleaves the DNA 3 - 4 base pairs upstream of the PAM sequence, the location of the cut site relative to the desired mutation should be carefully considered. For ssODN donor template design, if the desired knock-in is small (1 - 2 base pairs), the Cas9-gRNA RNP complex may still be able to recognize the sequence and engage in repeated cleavage-mutation cycles until a sufficient Cas9-gRNA-blocking mutation is generated, e.g. an INDEL, effectively reducing knock-in editing efficiency. To overcome this, a mutation disrupting the PAM site, or 3 - 4 silent/synonymous mutations (Figure 2A), can be incorporated into the donor DNA template design.3
hPSCs were electroporated with RNP complexes containing GFP-targeting crRNA, co-delivered with ssODN encoding nucleotides for GFP to BFP conversion. Knockout and knock-in efficiency were measured 72 hours after electroporation. Editing efficiency was equivalent when hPSCs were cultured in either mTeSR™1 or mTeSR™ Plus, however, we did observe cell line-dependent differences in editing efficiency (Figure 3).

Figure 3. Efficient Genetic Knockout and Knock-In in hPSCs Using the ArciTect™ CRISPR-Cas9 System
H1-eGFP and 1C-eGFP hPSC lines were cultured in mTeSR™1, or adapted to mTeSR™ Plus hPSC maintenance medium for at least two passages prior to initial experiments. Cells were electroporated with ArciTect™ RNP complexes containing GFPtargeting ArciTect™ crRNA:tracrRNA duplexes alongside ssODN encoding nucleotides to convert GFP to BFP. (A) Knockout (% GFP- cells) and (B) knock-in (% BFP+ cells) were measured by flow cytometry 72 hours after electroporation with ArciTect™ RNP complexes; n = 3. No significant differences were observed within cell lines.
1C-eGFP hPSCs were then electroporated with RNP complexes containing either GFP-targeting sgRNA or crRNA:tracrRNA duplexes, alongside ssODN encoding nucleotides for GFP to BFP conversion, to test knock-in and knockout efficiency with different gRNA formats. The sgRNA format exhibited higher knockout editing efficiency (Figure 4A), while both formats resulted in similar knock-in efficiencies (Figure 4B). Enhanced performance of sgRNA in editing hPSCs was confirmed by using crRNA or sgRNA targeting the β2 Microglobulin gene (B2M; Figure 4C). This strategy enabled monitoring of editing efficiency by flow cytometry, since expression of B2M is required for surface expression of major histocompatibility class I (MHC-I) molecules.4,5
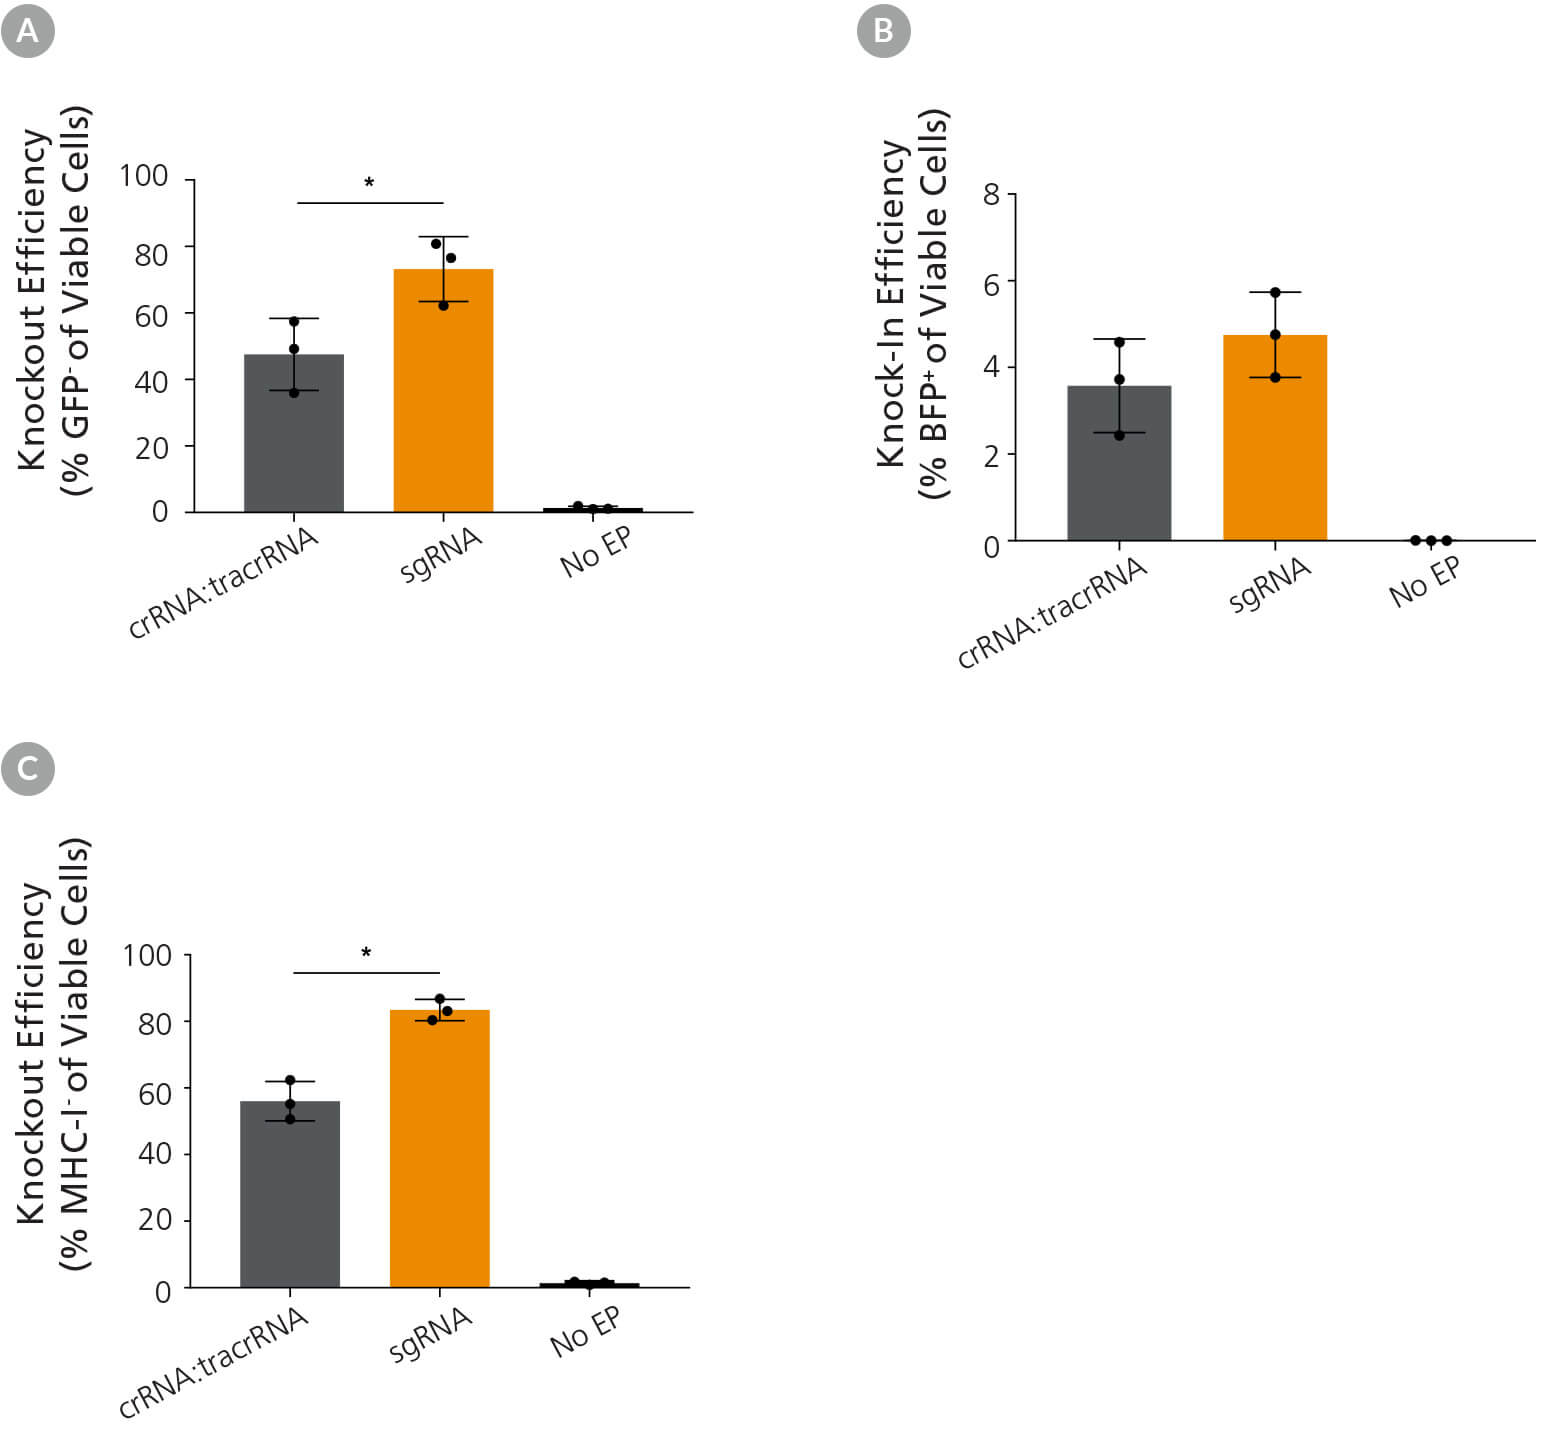
Figure 4. Comparison of Knockout and Knock-In Editing Efficiency Using Either ArciTect™ sgRNA or crRNA:tracrRNA Formats
1C-eGFP iPS cells were cultured in mTeSR™1 (Catalog #85850) supplemented with CloneR™ (Catalog #05888) for 24 hours after electroporation with CRISPR-Cas9 RNP complexes containing ArciTect™ Cas9 Nuclease and either ArciTect™ crRNA:tracrRNA duplexes or sgRNA targeting GFP, co-delivered with ssODN encoding nucleotides to convert GFP to BFP. (A) Knockout (% GFP- cells) and (B) knock-in (% BFP+ cells) efficiency were measured by flow cytometry 3 days after electroporation; n = 3, *P < 0.05. (C) 1C iPS cells were cultured in mTeSR™1 supplemented with CloneR™ for 24 hours after electroporation with CRISPR-Cas9 RNP complexes containing ArciTect™ Cas9 Nuclease and either ArciTect™ crRNA:tracrRNA duplexes or sgRNA targeting B2M. Knockout efficiency was measured by flow cytometry to detect MHC-I expression 3 days after electroporation. No EP: non-electroporated cells. Error bars represent standard deviation.
Transfection of Human ES and iPS Cells Using the TransIT-X2® Dynamic Delivery System
Materials Required
| Product | Catalog # |
|---|---|
|
ArciTect™ sgRNA |
|
|
ArciTect™ crRNA |
|
|
ArciTect™ tracrRNA Kit
|
|
|
ArciTect™ Cas9 Nuclease |
A. Plating Human ES or IPS Cells for Transfection
The following instructions are for harvesting single human ES or iPS cells from a 6-well plate for transfection in 24-well plates. If using other cultureware, adjust volumes accordingly.
- Coat cultureware with Matrigel® and bring to room temperature (15 - 25°C) for at least 30 minutes prior to use.
- Warm (15 - 25°C) sufficient volumes of mTeSR™1, CloneR™, DMEM/F-12, and ACCUTASE™.
- Prepare Single-Cell Plating Medium by adding CloneR™ to
mTeSR™1 at a 1 in 10 dilution.
Example: To prepare 10 mL of Single-Cell Plating Medium, add 1 mL of CloneR™ to 9 mL of mTeSR™1. - Aspirate matrix from coated cultureware and add 0.5 mL of Single-Cell Plating Medium to each well to be seeded.
- Use a microscope to visually identify regions of differentiation (if any) in the wells to be passaged. Mark these using a felt tip or lens marker on the bottom of the plate. Remove regions of differentiation by scraping with a pipette tip or by aspiration.
- Aspirate the remaining medium from the well and add 1 mL of ACCUTASE™. Incubate the plate at 37°C and 5% CO2 for approximately 5 minutes (incubation time may vary with different cell lines).
- Using a pipettor fitted with a 1000 μL tip, gently wash the cells from the surface of the plate by spraying the solution directly onto the colonies. Pipette the suspension up and down 2 - 3 times to break up small aggregates into single cells.
- Transfer the cell suspension to a 15 mL conical tube containing at least 5 mL DMEM/F-12 and mix by flicking the tube 2 - 3 times.
- Centrifuge the suspension at 300 x g for 5 minutes. Discard supernatant and resuspend cell pellet in 1 mL of Single-Cell Plating Medium.
- Count cells using a hemocytometer or automated cell counter.
- Add 1.25 x 10⁵ cells per well to the plate prepared in step 4.
Move the plate in several quick, short, back-and-forth and
side-to-side motions to evenly distribute cells.
NOTE: Optimal cell density may vary with different cell lines and is dependent on when the cells will be harvested. - Incubate at 37°C and 5% CO2 for 24 hours. Refer to Figure 5 for a representative image of cell morphology following 24 hours of incubation.
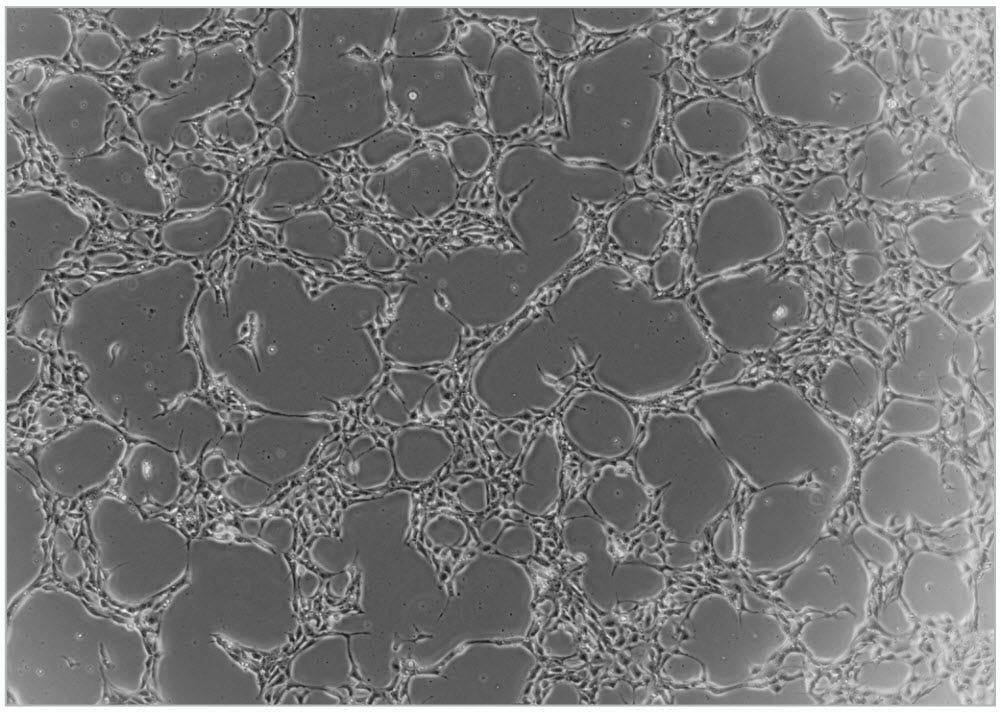
Figure 5. Typical Cell Density of WLS-1C Human iPS Cell Line 24 Hours After Plating 1.25 x 10⁵ Single Cells per Well
B. Preparation of ArciTect™ CRISPR-Cas9 RNP Complex for Chemical Transfection
Preparation of RNP and transfection should be performed approximately 24 hours after plating ES/iPS cells.
- Prepare 10 μM of sgRNA or 5 μM of crRNA:tracrRNA by combining the components listed in Table 8 in a microcentrifuge tube. The volumes below will provide sufficient reagent to transfect 4 wells of a 24-well plate; scale as needed. Mix thoroughly.
- If using crRNA:tracrRNA, in a thermocycler or heating block, incubate crRNA:tracrRNA mixture at 95°C for 5 minutes followed by 60°C for 1 minute. Cool to room temperature (15 - 25°C). If not used immediately, store at -80°C for up to 6 months. This step is not needed for sgRNA.
- Prepare a 5 μM Cas9 Nuclease solution in a microcentrifuge
tube as shown in Table 9. This will provide sufficient reagent
to transfect one well; if more transfections are required adjust
volumes as needed. Mix thoroughly.
NOTE: The amount of Cas9 to add will depend on the concentration and molecular weight of the Cas9 purchased, as shown in Table 9. - To prepare the RNP Complex Mix, combine components in a microcentrifuge tube as indicated in Table 10. Adjust component amounts according to the desired number of transfected wells. Mix thoroughly.
- Incubate the RNP Complex Mix at room temperature (15 - 25°C) for 10 - 20 minutes. While RNP complex forms, proceed immediately to section C.
Table 8. Preparation of 5 μM gRNA
Table 9. Preparation of 5 μM ArciTect™ Cas9 Nuclease Solution
Table 10. Preparation of 5 μM RNP Complex Mix for Chemical Transfection

NOTE: If two or more gRNAs are to be used in the experiment, each RNP complex should be prepared separately.
NOTE: May require optimization with different cell lines. A 1:2 (shown) to 1:8 molar ratio of Cas9 to gRNA is recommended.
C. Chemical Transfection of Human ES or iPS Cells with RNP Complexes Using the TransIT-X2® Dynamic Develivery System
Preparation of RNP and transfection should be performed approximately 24 hours after plating ES/iPS cells.
- To prepare the Transfection Mix, combine components in a microcentrifuge tube as indicated in Table 10. Adjust component amounts according to the desired number of transfected wells. Mix thoroughly by pipetting up and down.
- Incubate the Transfection Mix at room temperature (15 - 25°C) for 10 minutes.
- Remove the medium from cells plated onto 24-well plates the previous day, and replace with 450 μL of room temperature (15 - 25°C) mTeSR™1 per well. Place the plate in a 37°C and 5% CO2 incubator.
- To prepare RNP Transfection Mix, combine components in a microcentrifuge tube in the order listed in Table 12. Volumes shown are for a single well; scale accordingly to accommodate all RNP complexes and replicates.
- Pipette the RNP Transfection Mix up and down to mix thoroughly.
- Incubate the RNP Transfection Mix at room temperature (15 - 25°C) for 15 - 20 minutes; do not exceed 30 minutes.
- Add 50 μL of RNP Transfection Mix dropwise per well of the 24-well plate prepared in step 3. Mix by gently moving the plate back and forth 2 - 3 times.
- Incubate the plate at 37°C and 5% CO2.
- Perform a full medium change every 24 hours with 500 μL of room temperature (15 - 25°C) mTeSR™1.
- Culture cells for 48 - 72 hours after transfection to allow
genome editing to occur.
Note: Genomic DNA can be amplified by PCR using primers flanking the target region and ArciTect™ High-Fidelity DNA Polymerase Kit (Catalog #76026), followed by sequencing of the PCR products. Alternatively, ArciTect™ T7 Endonuclease I Kit (Catalog #76021) can be used to assess editing efficiency (% INDEL formation) following PCR amplification (see Figure 6).
Table 11. Preparation of Transfection Mix
Table 12. Preparation of RNP Transfection Mix
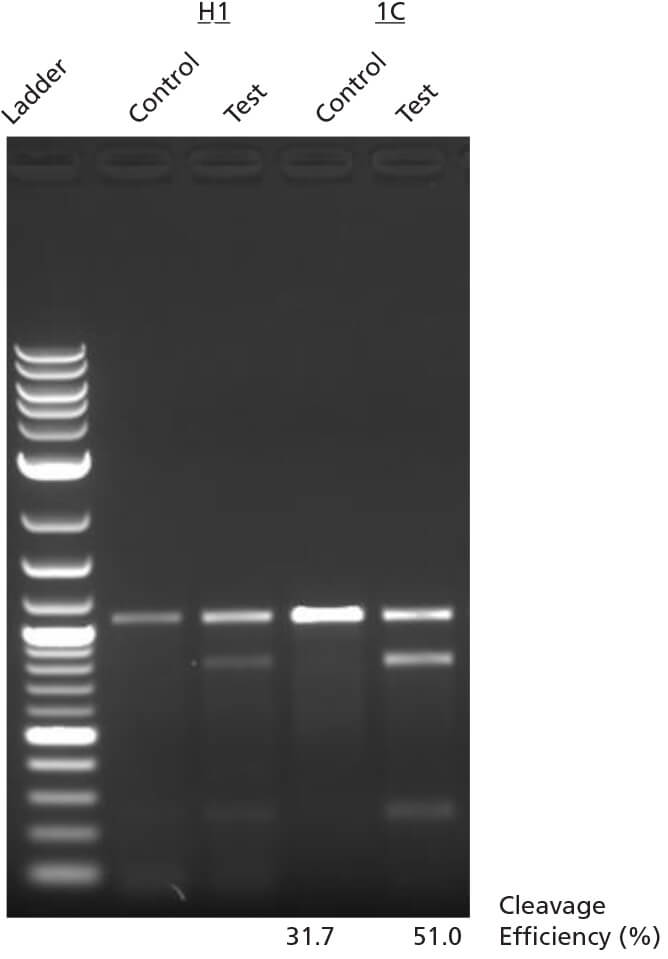
Figure 6. INDEL Detection by T7 Endonuclease I Assay
H1 ES cells or WLS-1C iPS cells were edited using ArciTect™ Human HPRT Positive
Control Kit, and INDEL formation was assessed using the T7 Endonuclease I Assay.
Control: Non-transfected cells; Test: HPRT-edited
Related Resources

ArciTect™ CRISPR-Cas9 Genome Editing System
Overcome challenges in efficient delivery and expression of CRISPR machinery using an RNP-based CRISPR-Cas9 system. ArciTect™ enables researchers to perform high-efficiency genome editing in difficult-to-manipulate cell types, including stem and primary cells.

Wiley E-Book: Genome Editing Applications
Learn about next-generation disease modeling using CRISPR, including comprehensive genome editing strategies for complex cell culture models, suggestions for optimizing experimental conditions, and troubleshooting tips.


References
- Heim R et al. (1994) Wavelength mutations and posttranslational autoxidation of green fluorescent protein. Proc Natl Acad Sci USA 91: 12501–4.
- Glaser A et al. (2016) GFP to BFP conversion: a versatile assay for the quantification of CRISPR/Cas9-mediated genome editing. Mol Ther Nucleic Acids 5: e334.
- Paquet D et al. (2016) Efficient introduction of specific homozygous and heterozygous mutations using CRISPR/Cas9. Nature 533: 125–9
- Bjorkman PJ et al. (1987) Structure of the human class I histocompatibility antigen, HLA-A2. Nature 329: 506–12.
- Zijlstra M et al. (1990) Beta 2-microglobulin deficient mice lack CD4-8+ cytolytic T cells. Nature 344: 742–6.
Request Pricing
Thank you for your interest in this product. Please provide us with your contact information and your local representative will contact you with a customized quote. Where appropriate, they can also assist you with a(n):
Estimated delivery time for your area
Product sample or exclusive offer
In-lab demonstration


