Robust Scale-Up of Human Pluripotent Stem Cells Using TeSR™ 3D Media
Introduction
3D Media
Suspension culture enables scale-up of human pluripotent stem cell (hPSC) manufacturing for applications requiring large numbers of hPSCs such as high throughput screening, generating master or working cell banks, and cell therapy research. However, the use of media optimized for two-dimensional (2D) adherent culture can result in low volumetric productivity and laborious workflows when applied to three-dimensional (3D) culture. STEMCELL has developed a portfolio of TeSR™ 3D-based media products for robust and scalable suspension culture of hPSCs as aggregates. The portfolio consists of mTeSR™3D (Catalog #03950), TeSR™-E8™3D (Catalog #03990), and TeSR™-AOF 3D (Catalog #100-0720). Each of these media can reduce time and labor with a fed-batch feeding strategy, using daily feeds to replenish nutrients and eliminating the need for medium exchanges on non-passaging days. In this document, we present five protocols for achieving robust scale-up of hPSC aggregates using STEMCELL’s portfolio of TeSR™ 3D-based media: Preparation of Media, Initiating hPSC Suspension Culture, Cell Counting A100-B Assay Using the ChemoMetec NucleoCounter® NC-250™, Passaging Aggregates, and Feeding Your Cultures.
Culturing Schedule
Cells should be passaged on an alternating 3-day/4-day schedule, which allows for weekend-free passaging. For rapid scale-up you can perform sequential 4-day passages to maximize yields. On all non-passaging days, the culture is fed either with a fed-batch media addition, or a 50% media exchange on day 3 of 4.
Culture Vessel and Size
For 2 mL cultures, we recommend using a non-TC treated 6-well plate (Catalog #38040) on an orbital shaker with a 1 inch orbital diameter set to 70 rpm. A Nalgene™ Rapid-Flow™ Sterile Filter Storage Bottle (ThermoFisher 455-0250) is recommended for culture volumes from 10 mL - 60 mL. Refer to Table 1 for culture volumes and corresponding agitation rates.
Table 1. Culture Volumes and Agitation Rates for Nalgene Filter Storage Bottles
For volumes ranging from 80 mL - 100 mL, a PBS-MINI 0.1 MAG Single-Use Vessel (Catalog #100-1006) with the PBS-MINI Bioreactor Base Unit (Catalog #100-1005) set to 35 - 40 rpm is recommended. For volumes ranging from 300 mL - 500 mL, a PBS-MINI 0.5 MAG Single-Use Vessel (Catalog #100-1007) with PBS-MINI Bioreactor Base Unit set to 40 - 45 rpm is recommended.
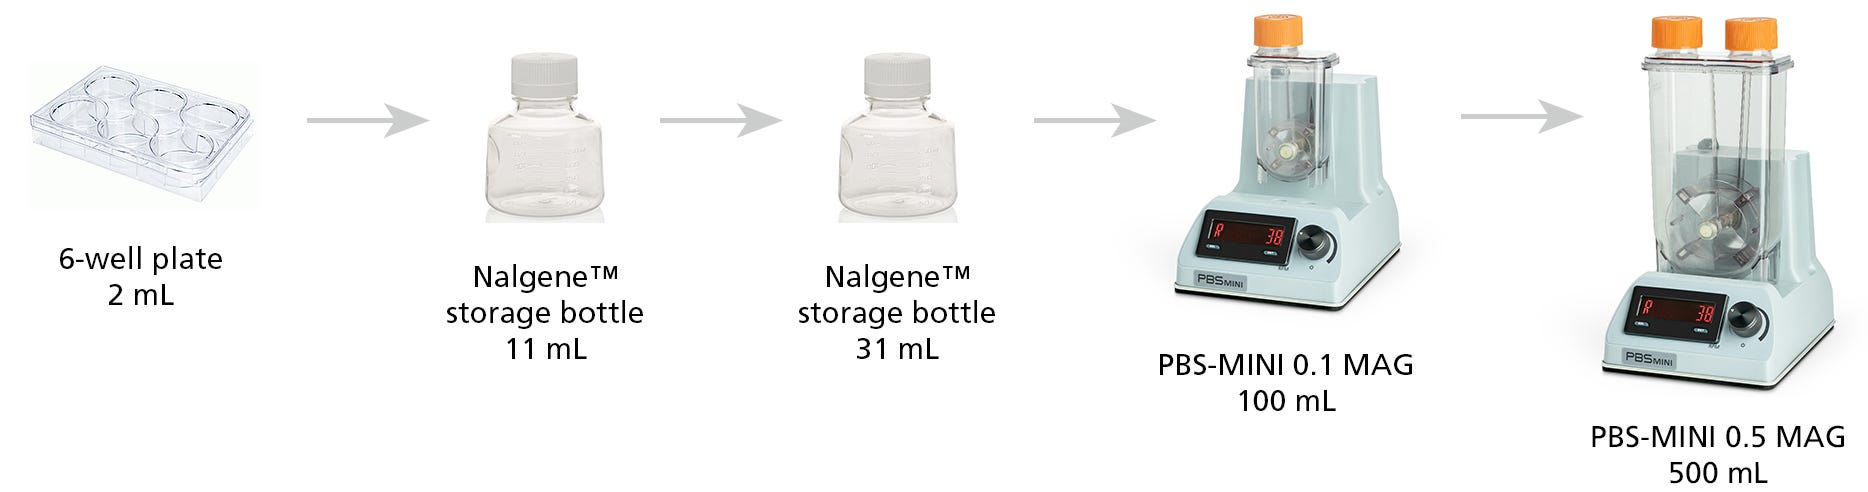
Figure 1. Culture Vessels Used in a Full hPSC Scale-Up from 2 mL to 500 mL.
Expansion in 3D hPSC culture systems has the potential to produce large volumes of cells. Therefore, STEMCELL's hPSC 3D media is optimized for expansion volumes from 2 mL suspension cultures in 6-well plates, up to 500 mL in PBS-MINI Bioreactors.
All vessels should be placed into an incubator at 37°C with 5% CO2.
Materials
- TeSR™ 3D-based media of choice
- mTeSR™3D (Catalog #03950)
- TeSR™-E8™3D (Catalog #03990)
- TeSR™-AOF 3D (Catalog #100-0720)
- D-PBS (Without Ca++ and Mg++) (Catalog #37350)
- Non-TC treated 6-well plates (Catalog #38040)
- Nalgene™ Rapid-Flow™ Sterile Filter Storage Bottle (ThermoFisher 455-0250)
- Gentle Cell Dissociation Reagent (Catalog #100-0485)
Protocols
A. Preparation of Media
- Thaw the Seed Supplement at room temperature (15 - 25°C) or overnight at 2 - 8°C. Do not thaw in a 37°C water bath. Mix thoroughly. Precipitate may be visible; warm to room temperature until dissolved.*
- Add the entire volume of Seed Supplement to the respective bottle of Seed Basal Medium. Mix thoroughly.
Note: If not used immediately, store Seed Medium in the Seed Basal Medium bottle or in 50 mL polypropylene tubes (e.g. Catalog #38010). Do not use other storage containers. Store Seed Medium at 2 - 8°C for up to 2 weeks or at -20°C for up to 6 months. After thawing the aliquoted medium, use immediately or store at 2 - 8°C for up to 2 weeks. Do not re-freeze.
- Thaw Feed Supplement(s) at room temperature (15 - 25°C) or overnight at 2 - 8°C. Do not thaw in a 37°C water bath. Mix thoroughly. Precipitate may be visible; warm to room temperature until dissolved.*
- For mTeSR™3D, combine Feed Supplement A and Feed Supplement B.
Note: If not used immediately, store Feed Supplement in the Feed Supplement bottle, 50 mL polypropylene tubes (e.g. Catalog #38010), or 2 mL or 0.5 mL polypropylene micro tubes (e.g. Sarstedt Catalog #72.694.006 or 72.730.005). Store Feed Supplement at 2 - 8°C for up to 2 weeks or at -20°C for up to 3 months. After thawing the aliquots, use immediately or store at 2 - 8°C for up to 2 weeks. Do not re-freeze.
Use sterile techniques to prepare media.
*Warming in a room temperature water bath may speed up the dissolving process.
B. Initiating hPSC Suspension Culture
Adherent 2D cultures grown on Corning® Matrigel® with mTeSR™1, mTeSR™ Plus, TeSR™-AOF or TeSR™-E8™ can be transitioned directly into dynamic suspension culture.
To successfully expand cells and maintain pluripotency in a suspension culture system, it is crucial to begin with high-quality hPSC cultures. Typically, hPSCs are maintained in 2D on Corning® Matrigel® with mTeSR™1, mTeSR™ Plus, TeSR™-AOF, or TeSR™-E8™, and are passaged with Gentle Cell Dissociation Reagent (Catalog #100-0485) as clumps that are 50 - 200 µm in diameter. For additional information on maintaining hPSCs as adherent colony cultures, refer to the Technical Manual: Maintenance of Human Pluripotent Stem Cells in mTeSR™1 (Document #10000005505), mTeSR™ Plus (Document #10000005507), TeSR™-AOF (Document #10000008160), or TeSR™-E8™ (Document #10000005516), available at www.stemcell.com or contact us to request a copy. High-quality hPSC cultures should express high levels of undifferentiated hPSC markers (>95%), including OCT4, TRA-1-60, and SSEA-3 as assessed by flow cytometry. They should also display normal colony morphology and a low percentage of differentiated cells, have normal growth rates, and retain karyotype as assessed by G-banding analysis or other methods. Note that chromosomal and genetic aberrations may appear during long-term passaging in any in vitro system. It is important to periodically check hPSC maintenance cultures to ensure maintenance of an expected human karyotype (representative of the donor material); we recommend checking cultures every 5 - 10 passages. For routine screening to detect the most common karyotypic abnormalities observed in hPSCs, the hPSC Genetic Analysis Kit (Catalog #07550) can be used.
This protocol is for initiating suspension cultures with small clumps derived from 2D adherent colony cultures. It will be familiar to those who have passaged 2D colony cultures grown in mTeSR™1, mTeSR™ Plus, TeSR™-AOF, or TeSR™-E8™ with Gentle Cell Dissociation Reagent (GCDR). GCDR is an enzyme-free reagent for passaging hPSCs as clumps with manual scraping to generate small aggregates from 2D culture.
The following are instructions for passaging cells from one well of a 6-well plate cultured in TeSR™ maintenance media on Corning® Matrigel®. If using other cultureware, adjust volumes accordingly.
- Prepare and aliquot a sufficient volume of Seed Medium and warm to room temperature (15 - 25°C).
Note: Do not warm Seed Medium in a 37°C water bath. Add 10 µM Y-27632 immediately before use and mix thoroughly.
- Use a microscope to visually identify regions of differentiation. Mark these using a felt tip or lens marker on the bottom of the plate.
- Remove regions of differentiation by scraping with a pipette tip or by aspiration. Avoid having the culture plate out of the incubator for more than 15 minutes at a time.
Note: Selection may not be required if differentiation is < 5%. Selection should not exceed 20% of the well. For further information, refer to the Technical Manual: Maintenance of Human Pluripotent Stem Cells in mTeSR™1 (Document #10000005505).
- Aspirate the spent medium from the well and add 1 mL of D-PBS (Without Ca++ and Mg++) at room temperature (15 - 25°C).
- Aspirate D-PBS from the well and add 1 mL of GCDR at room temperature (15 - 25°C).
- Incubate at room temperature (15 - 25°C) for 6 minutes.
- Aspirate GCDR. Add 1 mL of Seed Medium with 10 µM Y-27632. Gently detach the colonies by scraping with a serological glass pipette or a cell scraper.
Note: Take care to avoid scraping the colonies into clumps that are too small.
- Transfer the detached cell clumps to a 15 mL conical tube.
Optional: Rinse the well with an additional 1 mL of Seed Medium with 10 µM Y-27632 to collect remaining clumps.
- Carefully pipette the clump suspension up and down to break up the clumps as needed. A uniform suspension of aggregates approximately 50 - 100 µm in size is optimal; do not create a single-cell suspension.
- Aliquot the cell suspension to count clumps manually or use an automated cell counting instrument such as a ChemoMetec NucleoCounter® NC-250™ (see Protocol C for cell counting A100- B assay procedure). For recommended seeding density, see Table 2. Add concentrated clump suspension to the culture vessel to obtain the desired number of total viable cells or clumps and then top up medium with Seed Medium with 10 µM Y-27632 to desired total volume.
Table 2. Seeding Density
C. Cell Counting A100-B Assay using the ChemoMetec NucleoCounter® NC-250™
Once aggregates are passaged in clumps of 50 - 100 µm in diameter, cells can be quantified using the ChemoMetec NucleoCounter® NC-250™. The following are instructions on counting aggregated cells.
- In a microcentrifuge tube, combine 99 µL A100 solution, 1 µL DAPI, and 100 µL cell suspension. This is the lysed sample.
- Triturate the lysed sample ~20 times.
- Add 100 µL of B solution to the lysed sample.
- Triturate the lysed sample ~20 times.
- In another microcentrifuge tube, combine 99.5 µL cell suspension with 0.5 µL DAPI. This is the viable sample. Do not triturate.
- Using a Nucleocounter A-2 slide, aliquot 30 µL of lysed sample in chamber 1 and 30 µL of viable sample in chamber 2.
- Run A100-B assay count of aggregated cells on ChemoMetec NucleoCounter® NC-250™.
D. Passaging Aggregates
Aggregates in suspension grow in diameter over the course of a passage and must be dissociated and re-seeded every 3 - 4 days. Dissociating aggregates to small clumps rather than single cells is required to minimize the probability of selecting for sub-populations of cells with abnormal karyotypes; these can gain proliferative advantages in stressful single-cell environments. In the following passaging protocol, aggregates are dissociated to small clumps (50 - 100 µm in diameter) using Gentle Cell Dissociation Reagent (GCDR) and a 37 µm Reversible Strainer, then resuspended in Seed Medium with 10 µM Y-27632.
This protocol is for the dissociation of aggregates from an initial culture volume of 2 mL.
- Aliquot 1 mL of GCDR per well of culture, plus a little extra. For example, if passaging all six wells of a 6-well plate, aliquot ~6.5 mL of GCDR. Warm to 37°C.
- Prepare enough Seed Medium with 10 µM Y-27632 to resuspend and seed all conditions. Prepare 3.5 mL of Seed Medium with 10 µM Y-27632 per well of culture, plus a little extra. For example, if passaging all six wells of a 6-well plate, prepare ~22 mL. Bring Seed Medium to room temperature (15 - 25°C). Do NOT warm to 37°C.
- Image the cultures prior to passaging to assess aggregate size.
- Place a small 37 µm Reversible Strainer in a 15 mL conical tube with the arrow facing upwards. Use a 2 mL serological pipette to pass the entire volume of the culture through the Reversible Strainer into the 15 mL conical tube, thereby filtering out non-aggregated single cells.
Optional: With the same 2 mL serological pipette, lift the Reversible Strainer out of the conical tube, and aspirate ~1 mL of the spent medium. Use this to rinse the well of the 6-well plate and pass through the reversible strainer to ensure all aggregates have been transferred. Repeat this for all wells to be passaged at once, e.g. all six wells of a 6-well plate.
- Flip the strainer onto a new 15 mL conical tube and rinse with 1 mL of warm GCDR, gently tapping the strainer to dislodge all aggregates into the new tube. Repeat for all conditions being passaged.
- After the aggregates are rinsed off the strainer, flip the strainer onto a third 15 mL conical tube and set aside. This strainer will be used to dissociate aggregates into small clumps in Step 12. Ensure that the strainer side that contacted the aggregates is facing up to prevent any non-dissociated aggregates from being re-seeded into the subsequent passage. Repeat for all conditions being passaged.
- Incubate the conical tube(s) containing aggregates and GCDR in a 37°C water bath for 6 minutes, undisturbed, to allow the aggregates to settle. In this step, the aggregates are partially dissociated by the GCDR in preparation for generation of small clumps. Optimal incubation time may vary depending on the cell line.
- Gently remove the conical tube from the water bath without disturbing the cell pellet.
- Using a p1000 pipette, slowly aspirate the GCDR, careful to avoid removing any aggregates. Repeat for all conditions being passaged.
- Add 1 mL of Seed Medium with 10 µM Y-27632 to the tube. Repeat for all conditions being passaged.
- Using a 5 mL serological pipette, remove the resuspended and partially dissociated aggregates from the tube. Work quickly to prevent the aggregates from settling to the bottom of the pipette before pushing through the strainer.
- Using the strainer and new conical tube from step 6, place the pipette containing aggregates directly in contact with (i.e. on top of) the strainer in a vertical orientation so that the pipette is level, with no gaps between it and the strainer. With the slowest setting on the Pipette-Aid, force the partially dissociated aggregates through the strainer (0.5 mL/second flow rate). This will generate clumps of appropriate size to initiate the subsequent passage. Repeat for all conditions to be passaged at once.
- Pass an additional 0.5 mL of Seed Medium with 10 µM Y-27632 through the strainer to rinse off any remaining clumps. Repeat for all conditions being passaged.
- Gently flick the tube to resuspend clumps. Remove a sample for counting viable cells or clumps.
- Add the concentrated clump suspension to Seed Medium with 10 µM Y-27632 at room temperature (15 - 25°C) in a new well of a 6-well plate. Top up with additional medium to the desired final volume and cell density.
Note: Clumps may aggregate if left for extended periods of time (> 15 minutes) as a pellet. If so, flick the tube a few times to resuspend the clumps.
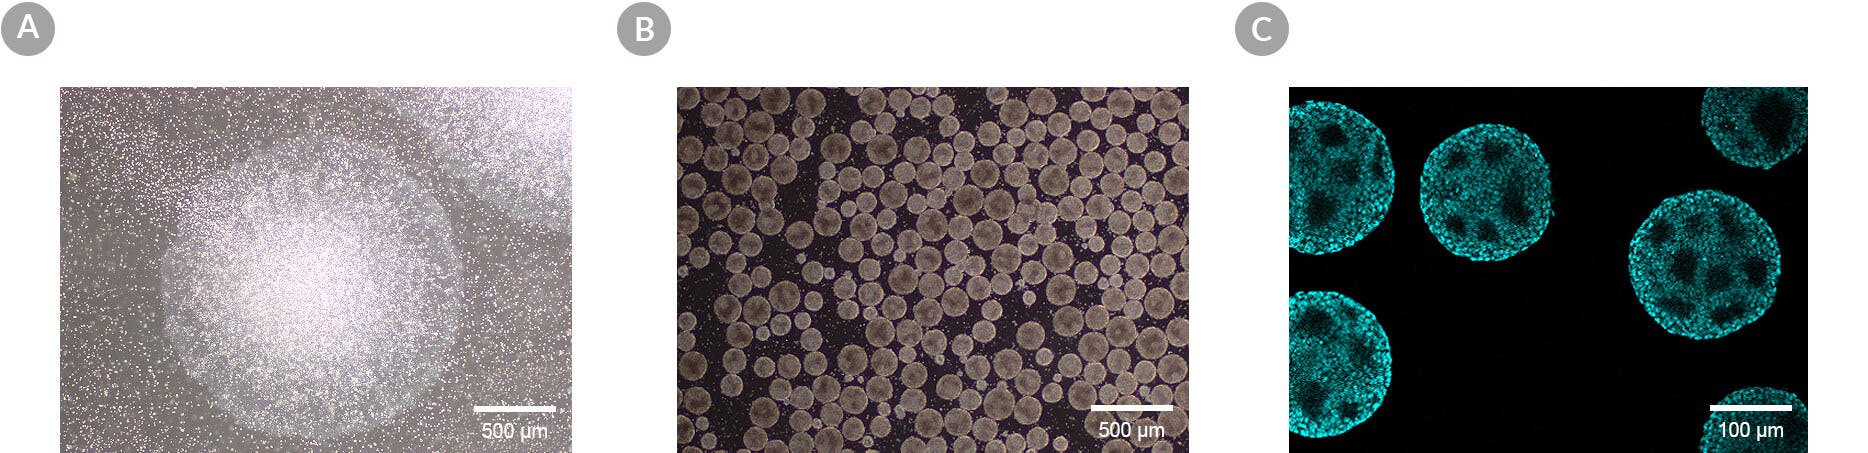
Figure 2. Characteristic Morphology of hPSCs Maintained in the Transition from 2D to 3D and Subsequent Scale-Up in 3D
In a scale-up culture, hPSCs are grown in a confluent 2D culture (A) before scaling up in 3D culture (TeSR™-AOF 3D) in a PBS-MINI MAG Single-Use Vessel (B). DAPI immunocytochemistry staining of 3D aggregates shows consistent void space formation (C).
The following are instructions for passaging aggregates from culture volumes of 2 to 100 mL. For volumes larger than 100 mL, please refer to the Technical Manual: TeSR™-AOF 3D (Document #10000010775).
- Use Table 3 to determine how much GCDR and Seed Medium with 10 µM Y-27632 is needed for each culture volume.
Table 3. GCDR and Seed Medium with 10 µM Y-27632 for Each Culture VolumeCulture Volume (mL)GCDR (mL)Seed Medium with 10 µM Y-27632 (mL)155530101060152010020255003040-50 - Warm the GCDR to 37°C and bring the Seed Medium with 10 µM Y-27632 to room temperature (15 - 25°C).
- Image the cultures prior to passaging to assess aggregate size.
- Allow aggregates to settle to the bottom of the culture vessel. Using a serological pipette, aspirate 50 - 80% of the spent media and pass through a large 37 µm reversible strainer into a waste bottle. Any aspirated aggregates will be captured on the reversible strainer.
- Flip the reversible strainer onto a 50 mL tube and wash the aggregates with 2 mL of fresh media.
- Transfer the remaining aggregates into the 50 mL tube. If there are aggregates left in the culture vessel, rinse the vessel with D-PBS (Without Ca++ and Mg++) at room temperature (15 - 25°C). For the larger volumes, several 50 mL tubes may be necessary.
- Once the aggregates have been transferred into 50 mL tubes, allow time for the aggregates to settle to the bottom. Tilting the tubes to 30 degrees can speed up this process. Alternatively, the tubes can be centrifuged at 600 rpm for 3 minutes to collect the aggregates.
- Aspirate the spent media using a serological pipette.
- Add the required amount of GCDR. If the aggregates were centrifuged, lightly flick the tube to resuspend the aggregates.
- Incubate for 8 minutes at 37°C.
- Aspirate the GCDR. If the aggregates have resuspended, the tubes can be centrifuged at 600 rpm for 3 minutes to collect the aggregates.
- Add the required amount of Seed Medium with 10 µM Y-27632.
- Using a 5 mL serological pipette with the tip broken off to increase surface area, transfer the aggregates from one 50 mL tube into a second 50 mL tube through a reversible strainer. With the slowest setting on the Pipette-Aid, force the partially dissociated aggregates through the strainer (0.5 mL/second flow rate). This will generate clumps of appropriate size to initiate the subsequent passage.
- If any aggregates or medium remain, pass an additional 2 mL of Seed Medium with 10 µM Y-27632 through the strainer to rinse off any remaining clumps. Use a 5 mL serological pipette as this will ensure all media is aspirated.
- To count the cells, refer to Protocol C: Cell Counting A100-B Assay using the ChemoMetec NucleoCounter® NC-250™.
E. Feeding Your Cultures
After initiating hPSC suspension culture, passage the suspension culture on an alternating 3-day/4-day schedule. The first passage after culture initiation can be either a 3-day or a 4-day passage, with the subsequent passages alternating passage length. The cultures must be fed on all non-passaging days, either through addition of a fed-batch Feed Supplement or a 50% medium exchange using the Seed Medium.
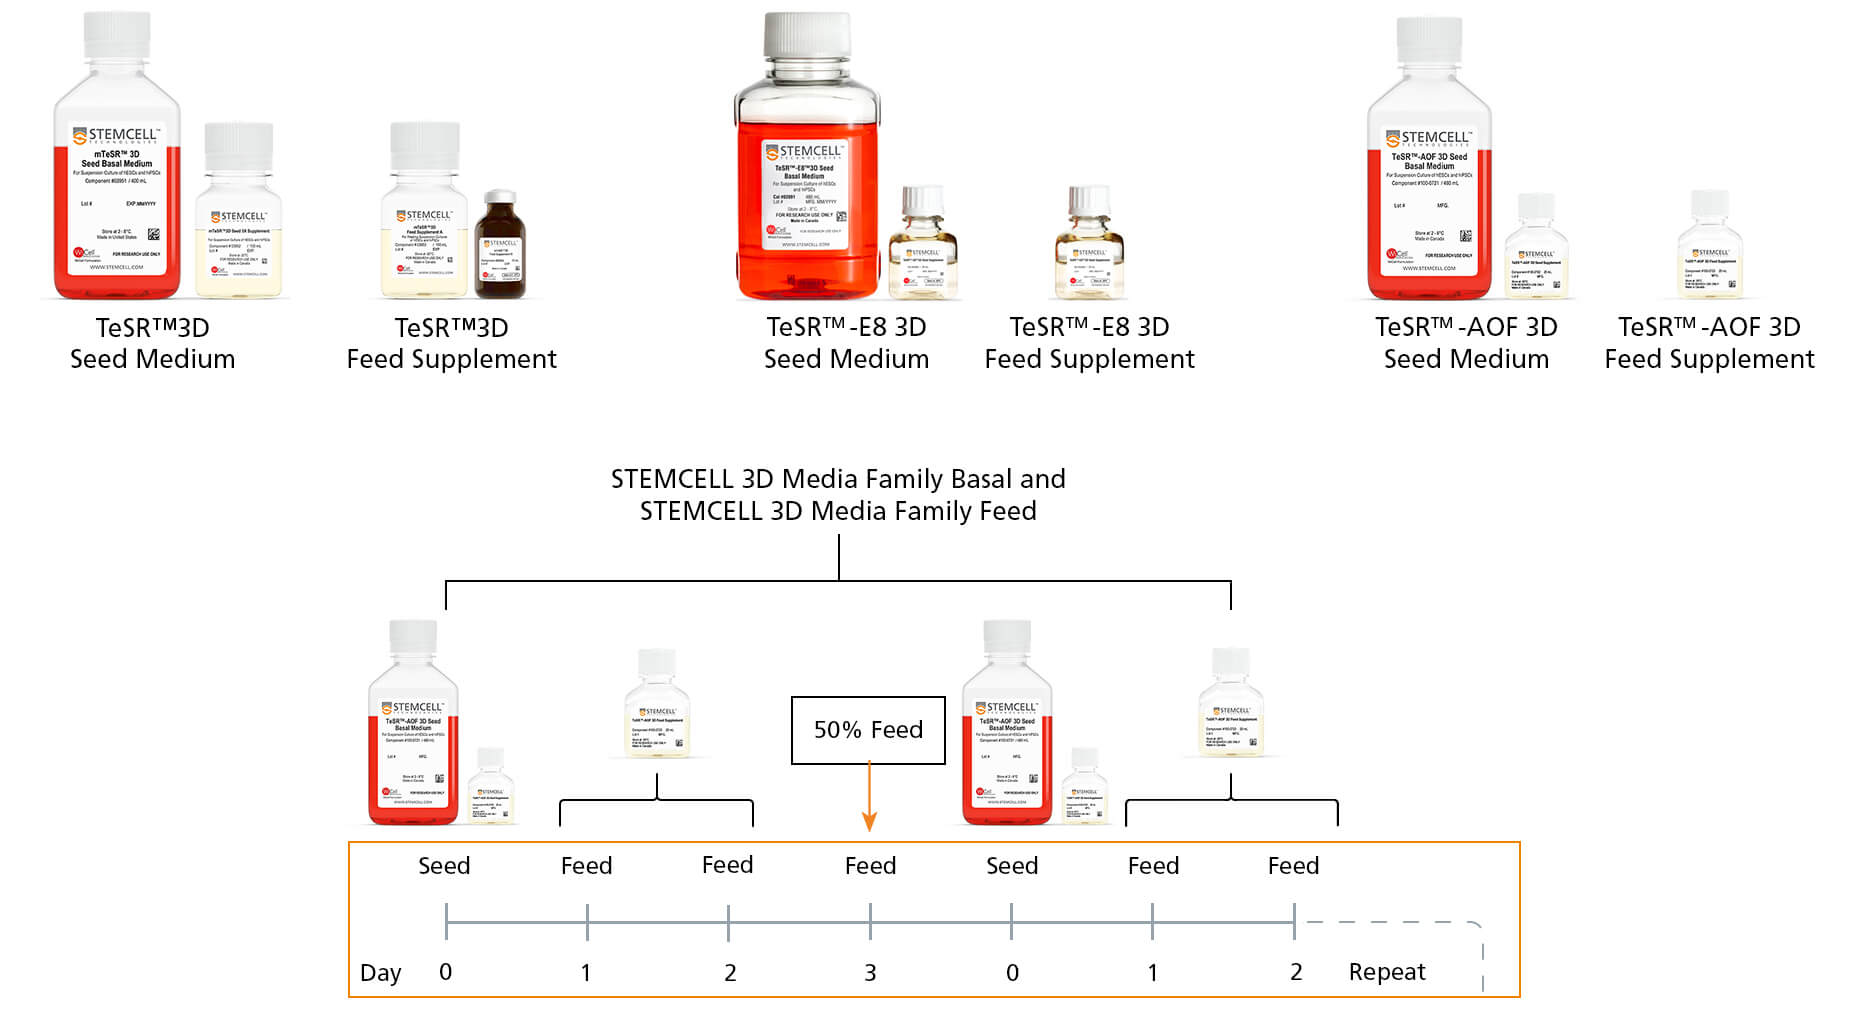
Figure 3. STEMCELL’s Fed-Batch Culture Media and Feed Protocol
The portfolio of TeSR™ 3D media is designed to support scale up of hPSCs in 3D suspension culture as well as save time and labor, reduce culture media, and produce healthier cultures due to less disruption during growth.
See Table 4 for the feeding schedule. STEMCELL’s 3D media use fed-batch feeding with the Feed Supplement for the first two days following passaging. For a four-day passage only, the third day requires a 50% medium exchange. This means that there will be one 50% medium exchange every week.
Table 4. Feeding Schedule
Feed Supplement Addition:
- Prepare the Feed Supplement as described above.
- Mix the Feed Supplement by pipetting up and down.
- Add the appropriate volume of Feed Supplement to the center of the culture. Do not remove any medium. Change pipette tips between cultures to prevent cross-contamination.
See the Product Information Sheet or Technical Manual, available at www.stemcell.com, of the 3D media being used for the required Feed Supplement volume.
50% Medium Exchange:
If passaging on Day 4, perform a 50% medium exchange on Day 3 using the Seed Medium without Y-27632. Do not add Feed Supplement on this day.
- Prepare and aliquot a sufficient volume of Seed Medium (without Y-27632) and warm to room temperature (15 - 25°C). Note: Do not warm Seed Medium in a 37°C water bath.
- Remove the culture vessel from the agitation platform and transfer to a sterile environment. Allow aggregates to settle in the culture vessel. It is recommended to lean the 6-well plate or culture vessel at a 45-degree angle to allow the aggregates to settle into the bottom edge. If the aggregates are not settling, remove 50% of the original culture volume and pass through a reversible strainer into a 50 mL tube to capture the suspended aggregates.
- Flip the reversible strainer over the original culture vessel and add 50% fresh Seed Medium (without Y-27632) equal to the volume of medium removed, ensuring all captured aggregates are washed away from the reversible strainer.


Request Pricing
Thank you for your interest in this product. Please provide us with your contact information and your local representative will contact you with a customized quote. Where appropriate, they can also assist you with a(n):
Estimated delivery time for your area
Product sample or exclusive offer
In-lab demonstration


