How to Isolate Mouse Intestinal Crypts
This protocol is part of a series of protocols for isolating, culturing, passaging, and cryopreserving mouse small intestinal and colonic crypts as organoids using IntestiCult™ Organoid Growth Medium (Mouse).
Materials
- 10 cm dish (e.g. Culture Dish, Non-Treated, Catalog #38045)
- Forceps and scissors
- PBS (e.g. D-PBS, Catalog #37350)
- Gentle Cell Dissociation Reagent (Catalog #07174)
- Bovine serum albumin (BSA)
Protocol
Part I: Preparation of Mouse Intestinal Segment
- Sacrifice a mouse according to applicable ethical regulations and harvest 20 cm of small intestine proximal to the stomach. Use pointed forceps to remove any membrane, blood vessels, and fat from the exterior of the intestine (Figure 1). Place the intestinal segment into a 10 cm dish containing 5 mL cold (2 - 8°C) PBS.
For Colon: The following protocol can be performed using the colon from one mouse; however, due to the high degree of variability between new users, it is suggested to use the colon from two or three mice to ensure a greater seeding density when performing the protocol for the first time.
Harvest 3 - 6 cm of colon per sacrificed mouse; be sure to cut the colon a few millimeters below the cecum and a few millimeters above the rectum to prevent the introduction of excessive toxins and waste into the culture. Note, stem cell density is greatest in the proximal colon; therefore excising more tissue near the rectum will not significantly increase the number of crypts.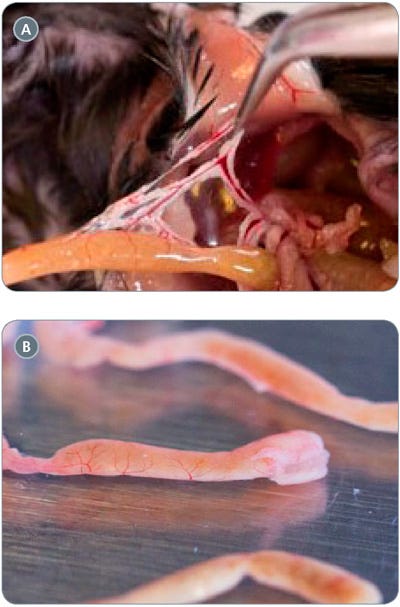
Figure 1. Isolation of Mouse Intestine
(A) removal of external membrane and fat from mouse intestine; (B) harvested mouse intestinal segment after removal of external membrane.
- Gently flush the intestinal segment with 1 mL cold (2 - 8°C) PBS by inserting a 1 mL pipette tip into one of the open ends of the intestine.
- Using small scissors, cut the intestinal section open lengthwise (Figure 2A) and open such that the lumen of the intestine is facing up. Use a micropipette to gently wash the intestinal sheet with 1 mL cold (2 - 8°C) PBS three times (Figure 2B).
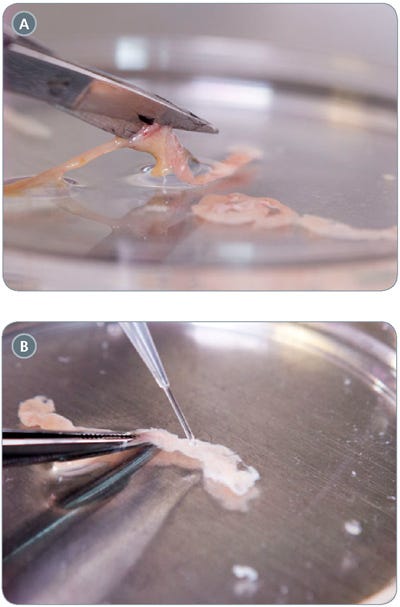
Figure 2. Preparatory Steps for Mouse Intestinal Segment
(A) cutting open the intestinal segment; (B) washing the intestinal segment with 1 mL cold PBS.
Part II: Isolation Mouse Intestinal Crypts
- Pre-wet pipettes and pipette tips
Throughout the procedure you will need to pre-wet pipettes and pipette tips before manipulating intestinal pieces or crypts to prevent the tissue from sticking to the wall of the pipette. - Be aware of centrifugation speeds
Throughout this procedure both 200 x g and 290 x g centrifugation speeds are used frequently.
- Transfer the intestinal segment to a clean 10 cm dish containing 15 mL of fresh, cold (2 - 8°C) PBS. Using forceps, move the intestinal segment through the clean buffer to rinse thoroughly.
- Add 15 mL cold (2 - 8°C) PBS to a 50 mL conical tube. Using forceps, hold the washed intestine by one end over the tube. Starting from the bottom of the intestine, use scissors to cut the intestine into 2 mm pieces, allowing these pieces to fall into the buffer in the tube.
- Pre-wet a 10 mL serological pipette with PBS and use it to gently pipette the intestinal pieces up and down three times.
- Let the pieces settle by gravity (approximately 30 seconds; Figure 3A) and then gently aspirate off the supernatant, leaving enough liquid to just cover the pieces of tissue (Figure 3B).
- Add 15 mL fresh cold (2 - 8°C) PBS and repeat the rinsing procedure by pipetting the suspended tissue pieces up and down three times using a pre-wetted 10 mL serological pipette.
- Using the same pipette, repeat steps 4 - 5 another fifteen to twenty times, or until the supernatant is clear (Figure 3C).
For Colon: In contrast to the small intestine, when isolating colon crypts the supernatant typically becomes clear after only three to five washes with cold (2 - 8°C) PBS. Despite this appearance, colonic pieces should be washed fifteen times with cold PBS before proceeding to the next step. - Remove the supernatant, resuspend the tissue pieces in 25 mL room temperature (15 - 25°C) Gentle Cell Dissociation Reagent and incubate at room temperature (15 - 25°C) for 15 minutes on a rocking platform at 20 rpm.
For Colon: Increase incubation time to 20 minutes. - Let the tissue segments settle by gravity for approximately 30 seconds. Gently pipette off and discard the supernatant, leaving enough liquid to just cover the pieces of tissue.
- Resuspend the tissue pieces in 10 mL cold (2 - 8°C) PBS containing 0.1% BSA and pipette up and down three times. Wait for the majority of the intestinal pieces to settle to the bottom (approximately 30 seconds).
- Using the same pipette, gently remove the supernatant and filter it through a 70 μm filter, collecting the filtrate in a fresh 50 mL conical tube. Discard the filter and label the filtrate “Fraction 1”. Place this fraction aside on ice.
- Repeat steps 9 - 10 three times to generate fractions 2 - 4.
For Colon: Due to the persistence of debris and waste in the murine colon, an additional one or two fractions might be required. Generate the first four fractions, then plate 1 mL of each into a separate well in a 6-well plate and inspect under a bright field microscope at 4X. If fractions 3 and 4 have a high proportion of thin fibrous material, repeat steps 9 - 10 to generate fractions 5 and 6. If fractions 3 and 4 look clean, continue to centrifugation step 12. Proceed to step 12 after any additional fractions have been collected. - Centrifuge the fractions at 290 x g for 5 minutes at 2 - 8°C. Carefully pour off and discard the supernatants, retaining the pellet in each tube.
- Resuspend each of the pellets in 10 mL cold (2 - 8°C) PBS buffer containing 0.1% BSA. Transfer each suspension to a fresh 15 mL conical tube labeled with the appropriate fraction number.
- Centrifuge the four fractions at 200 x g for three minutes at 2 - 8°C. Gently pour off the supernatants. The pelleted intestinal crypts will remain in the tubes.
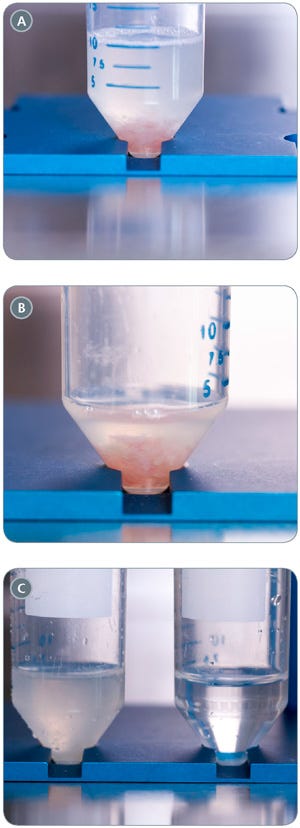
Figure 3. Washing Steps for Mouse Intestinal Pieces
(A) intestinal pieces settled in bottom of tube; (B) intestinal pieces following aspiration of supernatant; (C) wash supernatants from first (left) and 20th (right) wash.
Learn how to establish organoids from isolated intestinal crypts >
Frequently Asked Questions
Why is the crypt isolation procedure performed at 4°C using cold DMEM/F-12?
The procedure for crypt isolation is performed at 4°C to ensure minimal damage to the intestinal crypts.
Can the segments of the intestine be larger than 2 mm? What is the range for the size?
Intestinal segments of 2 mm enable efficient washing and crypt dissociation using the method described in the protocol. Larger segments may require more rounds of rinsing and may result in lower crypt recovery.
Is it okay to centrifuge the pieces rather than wait for them to settle by gravity? If so, what speed should be used?
We recommend letting the pieces settle by gravity as centrifugation during washing may result in pelleting of additional impurities, while centrifugation during crypt isolation may result in pelleting of crypts and result in poor crypt recovery.
Request Pricing
Thank you for your interest in this product. Please provide us with your contact information and your local representative will contact you with a customized quote. Where appropriate, they can also assist you with a(n):
Estimated delivery time for your area
Product sample or exclusive offer
In-lab demonstration


