Considerations for Flow Cytometry Gating
To achieve accurate results, it is important to use an optimal gating strategy when assessing cell samples via flow cytometry
There are a number of factors to consider and incorporate into your FACS staining and gating strategy, including:
Compensating for Spectral Overlap
The emission spectra of some existing fluorophores are quite large, so the spectral emission of a particular fluorophore can be detected by additional sensors rather than by the sensor designated to measure the emission peak of that fluorophore. This overlap of emission spectra in the various detection regions contributes to background fluorescence and leads to false- positive events during the flow cytometry analysis.
Spectral overlap can be reduced by choosing combinations of fluorophores that have little overlap in terms of their emission spectra. Additionally, good practice would be to use ‘compensation controls’ consisting of cell samples each stained with one of the fluorophore conjugated antibodies that will be used in the multicolour flow panel. The latter will allow compensation setting for potential spectral overlap. If compensation setting is difficult due to the low expression of the target marker or low frequency of the target cells, an antibody targeting a different marker but conjugated to the same fluorophore could be used. In this case, the signal intensity of the control sample for the given fluorophore must be at least as bright as in the test sample. Alternatively, compensation beads can be used instead of stained cells.
When using antibodies labeled with tandem fluorophores it is recommended to use the same antibody lot for compensation as the lot that will be used in the experiments, due to the tendency of higher lot-to-lot variability in emission spectra for these fluorophores.
Using Appropriate FACS Gating Control
To be able to discern whether cells are positive or negative for the markers under study and to set appropriate gates, one will need to use negative controls. Two types of negative controls are usually suggested.
1. Fluorescence Minus One (FMO) Control
FMO controls are samples containing all the fluorophore-labeled antibodies present in the sample under study minus one. Use of FMO controls will allow proper gate setting considering the spread in background signal of the negative population for a given fluorophore emission due to the use of a flow analysis panel with multiple fluorochromes.
This control is particularly important when the expression levels of the markers of interest are low in a multicolor flow cytometry panel. FMO controls should be set up for every fluorophore- labeled antibody in the staining panel, allowing determination of the cut-off between cells that are negative and positive for the given fluorophore emission.
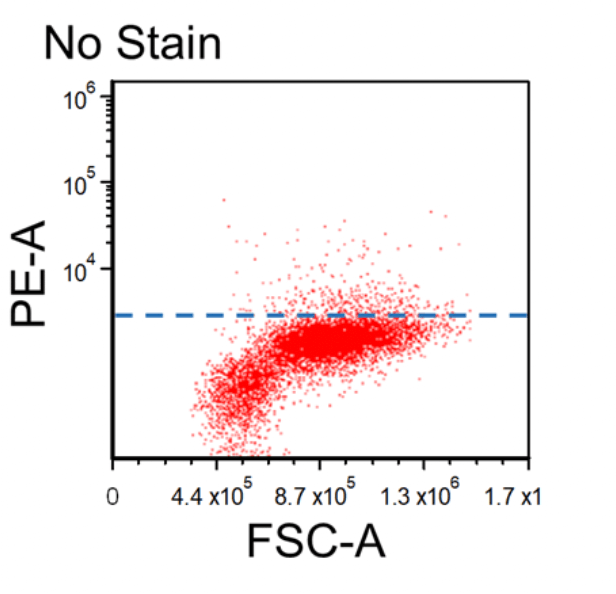
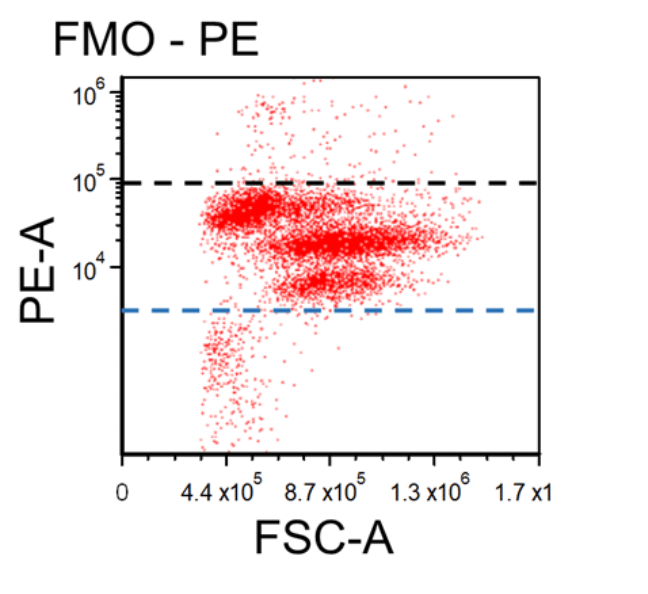
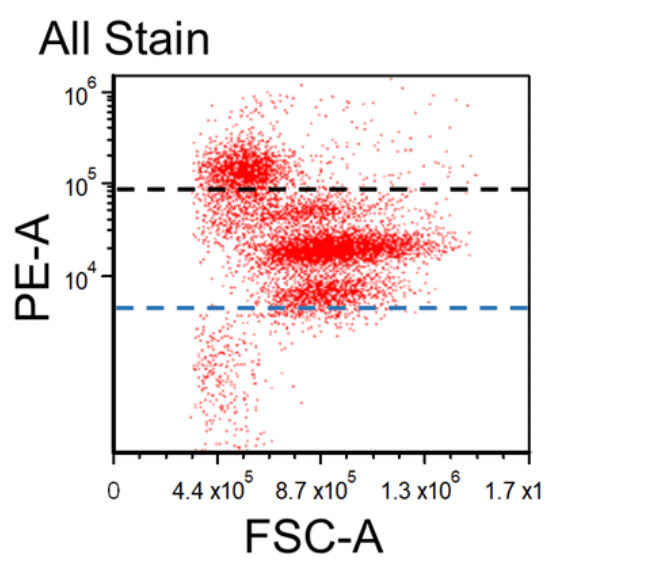
Figure 1. Dot plots of multicolor flow cytometry showing the fluorescence spread into the PE channel (FMO control compared to a no stain control). Black dotted line represents the FMO gating boundary compared to the no stain boundary in blue.
In the above example, the FMO control for the anti-CD3-PE antibody consists of a sample stained with anti-CD45-FITC and anti-CD56-APC antibodies plus PI, all of which are part of the final staining panel. The FMO control allows determination of the cut-off between cells that are negative vs. positive for the CD3 marker and allow proper gate setting. The same approach is used to set the gates for the dead cells (PI) and the CD45 and CD56 markers, respectively.
2. Isotype Control
Isotype control is used as a control for nonspecific binding of a given fluorophore conjugated antibody. If an isotype control is used, it should exactly match the specific antibody for which it acts as a control in terms of heavy and light chain subtype, number of fluorochromes attached to the antibody, manufacturing process, and concentration of the antibody. Alternatively, a biological control could be used. The latter consists of a cell subset in the test sample that does not express the marker under study.
Excluding Debris
When acquiring data on the flow cytometer, create a Forward Scatter (FSC) versus Side Scatter (SSC) plot and ensure that all the expected cell populations are visible by adjusting the individual FSC and SSC photomultiplier tube settings. Make sure that most of the debris, air bubbles, and laser noise (all of which should be FSC-low), are removed from the analysis by setting and adjusting the FSC Threshold as necessary. Next, insert a region (R1) around your cell populations of interest on this FSC vs. SSC plot. This region can be regarded as "Region 1 - FSC vs. SSC".
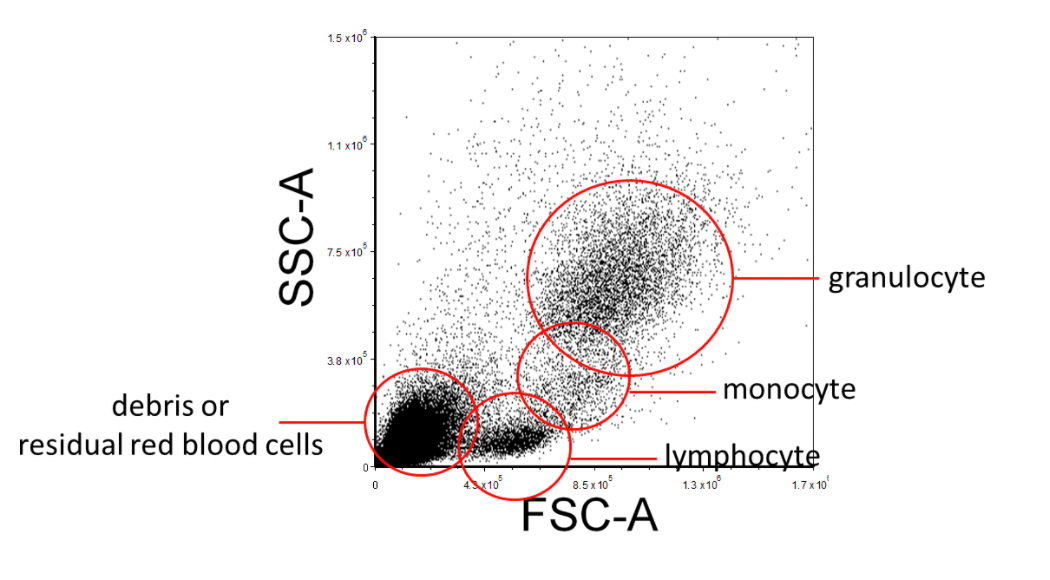
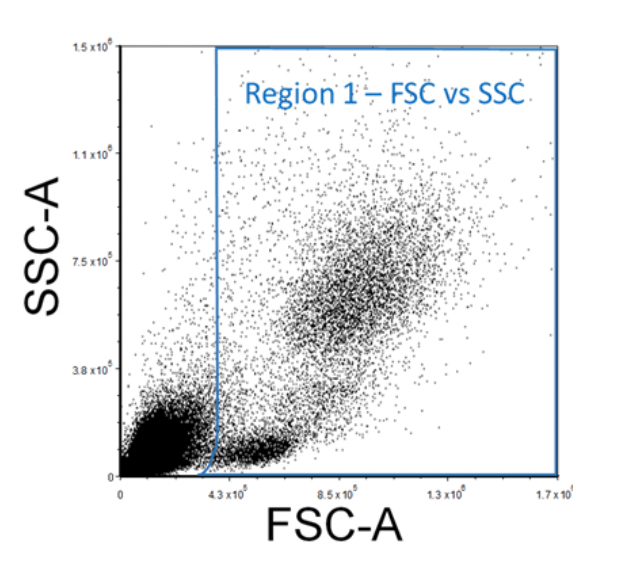
Figure 2. Example FSC Vs. SSC FACS Gating Strategy of Lysed Human Whole Blood
Excluding Doublets or Multiplets
During data acquisition, multiple cells may stick together, forming doublets or multiplets, and when passing through the laser may be counted as one single event. This will potentially skew the results when multiple subpopulations are present in the sample. To exclude multiplets, create an FSC-H versus FSC-A (or FSC-W) plot, and then apply the “Region 1 - FSC vs. SSC” gate onto it. Multiplets will have higher area and width signal values compared to single cells whilst the height is roughly the same. Therefore, disproportions between height, width, and area can be used to identify doublets. Insert a region around the singlet cells; this will be “Region 2 - Singlet”.
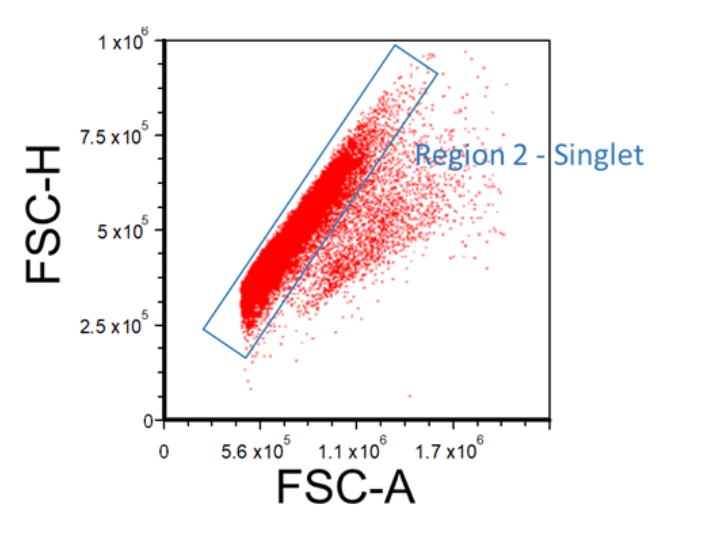
Figure 3. Example FSC-A Vs. FSC-H Plot Showing How to Gate for Singlets
Excluding Non-Viable Cells
Cells should be stained with a viability dye such as propidium iodide (PI), 7-AAD, or a fixable viability dye in order to discern between living and dead cells. First, create an FSC vs. Viability Stain plot, and then apply the "Region 2 - Singlet" gate onto it. Afterward, insert a region around the viable cell populations; this will be "Region 3 - Viable".
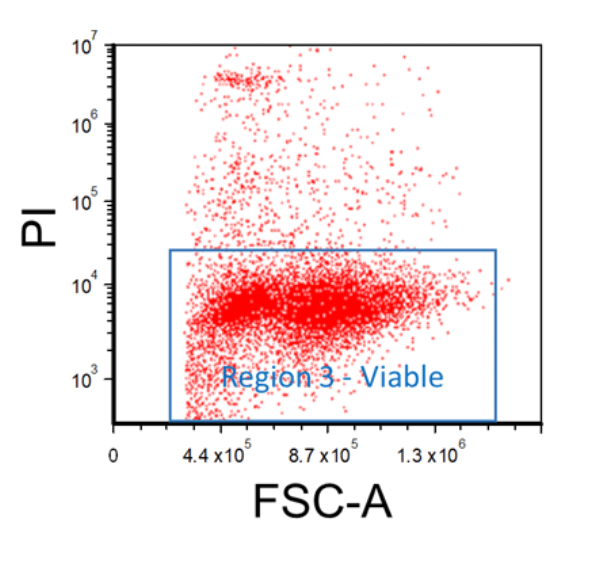
Figure 4. Example FACS Gating for Viable Cells
Staining With a Leukocyte Marker
When isolating for a leukocyte subset, it is useful to stain the cells with a leukocyte marker such as CD45. This will be helpful in gating out residual contaminating cells such as red blood cells. First, create an FSC vs. Shared Marker plot and then apply the "Region 3 - Viable" gate onto it. Afterward, insert a region around the cell populations that express CD45; this will be "Region 4 - Leukocyte Marker". Use the appropriate negative controls mentioned previously to help discern the positive signal from the background fluorescence.

Figure 5. Example FACS Gating for Leukocytes
Setting Up Necessary Fluorochrome Analysis Plot
Necessary fluorophore analysis plots can now be created as needed (i.e. FSC vs FITC or FITC vs PE, etc.). Please be sure that "Region 1 - FSC vs SSC", "Region 2 - Singlet", "Region 3 - Viable", and if applicable "Region 4 - Leukocyte Marker", gates are applied onto each of these fluorophore plots. Use the appropriate negative controls mentioned previously to help discern the positive signal from the background fluorescence.
Please consult your flow cytometer's manual on an appropriate compensation procedure or your flow cytometry analysis software documentation for more detailed instructions.
For further assistance and information on what is presented here, please contact techsupport@stemcell.com.
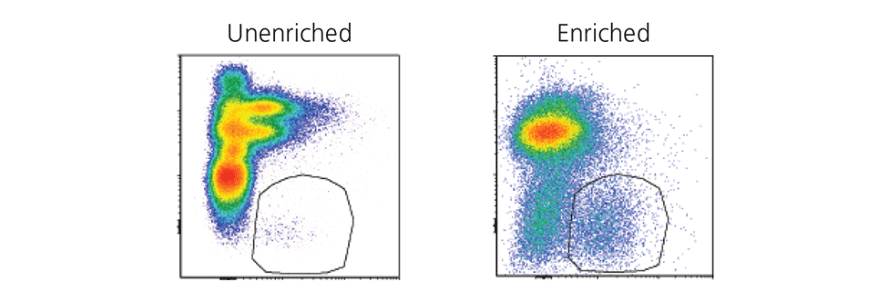
Pre-Enrich Cells Prior to FACS
Learn how to Improve the efficiency and quality of your cell sorting by pre-enriching cells prior to FACS.

Antibodies for Cell Analysis
Choose high-quality antibodies to ensure that your downstream cell analysis, including flow cytometry, works consistently.


Request Pricing
Thank you for your interest in this product. Please provide us with your contact information and your local representative will contact you with a customized quote. Where appropriate, they can also assist you with a(n):
Estimated delivery time for your area
Product sample or exclusive offer
In-lab demonstration


