How to Use the hPSC Genetic Analysis Kit with 96-Well Plates
We recommend using 384-well plates with the hPSC Genetic Analysis Kit (Catalog #07550) because this allows you to run up to 10 samples on one plate (including the control) with a total volume of only 10 µL per well. This will help you to save reagents and time.
However, if you do not have the capability to use 384-well plates, you can use the following suggested protocol for 96-well plates. Note that you will need to run the Chr 4p control on each separate plate to ensure accurate normalization. The following protocol results in a total volume of 15 µL per well (please confirm that this volume is sufficient for your qPCR instrument):
Materials
- hPSC Genetic Analysis Kit (Catalog #07550)
- Genomic DNA Purification Kit (Catalog #79020)
- Microcentrifuge tubes, 0.65 mL (e.g. Catalog #38037)
- 96-well qPCR plate
- Nuclease-free water (e.g. Catalog #79001)
- Optical adhesive film (e.g. Catalog #38108)
Protocol
Before you begin:
Follow the instructions in the Product Information Sheet (PIS; Document #10000000353) until section C step 2, on page 3. After you have measured your DNA concentrations, proceed as follows:
- In a 0.65 mL microcentrifuge tube, add 2.3 µL Genomic DNA Control to 132.7 µL of nuclease-free water and place on ice.
- Add 450 ng of genomic DNA sample to separate 0.65 mL microcentrifuge tubes and adjust the volume to 135 µL with nuclease-free water. Place tubes on ice.
Note: If the concentration of the genomic DNA sample is > 450 ng/µL, it is recommended to dilute the sample using nuclease-free water so that an appropriate volume of genomic DNA is added (> 1 µL). - Vortex Master Mix + Dye (prepared in section B of the PIS) on high for 5 seconds. Add 225 µL to each genomic DNA sample and the control (prepared in steps C3 - C4). Pipette up and down 2 - 3 times to mix. Place the tubes on ice and protect from light.
Note: Master Mix + Dye is viscous; pipette with care to avoid loss of material in the pipette tip.
D. Primer-Probe Mixes
- Prepare the primer-probe stock solutions as follows:
a. Centrifuge the Genetic Assay tubes (e.g. Chr 4p Genetic Assay) at 750 x g for 10 seconds to ensure the contents are at the bottom of the tube.
b. Add 33 µL of TE Buffer to each tube. Pipette the solution up and down the sides of the tube to ensure complete resuspension.Note: Use a separate pipette tip between Genetic Assays to avoid cross-contamination.c. Centrifuge tubes at 750 x g for 10 seconds.Note: If not used immediately, aliquot and store at -20°C. Do not exceed the expiry date on the label. After thawing the aliquots, use immediately. Do not refreeze. - Calculate the number of reactions required for each primer-probe using the equation below:
Number of reactions per primer-probe = (Number of genomic DNA samples [including control] to be analyzed x 3) + n
Where:
For 2 - 5 samples, n = 2 OR
For 6 - 10 samples, n = 3 OR
For > 10 samples, n = 10% of the number of samples - Prepare the primer-probe mixes by combining each primer-probe stock solution (prepared in step D1) with nuclease-free water in individual 0.65 mL microcentrifuge tubes. Refer to table 1 for example volumes or calculate the volumes required as follows:
Volume of nuclease-free water = Number of reactions per primer-probe x 1.5 µL x 1.5
Volume of primer-probe stock solution = Number of reactions per primer-probe x 0.5 µL x 1.5
Table 1. Example Volumes for Preparing Primer-Probe Mixes
Number of samples (including control DNA)23Number of reactions811Volume of nuclease-free water (µL)1824.75Volume of primer-probe stock solution (µL)68.25Total volume (µL)2433 - Place the tubes on ice and protect from light.
qPCR Plate Setup:
- For the control and each genomic DNA sample prepared in section C (containing Master Mix + Dye), vortex on high for 5 seconds, then centrifuge briefly to collect material at the bottom of the tube. Add 12 µL to the bottom edge of each well of the prepared plate. Repeat for each sample until all samples have been loaded.
- Working with one primer-probe mix at a time, vortex on high for 5 seconds, then centrifuge briefly to collect material at the bottom of the tube. Add 3 µL to the appropriate row of the plate, at the top edge of the well. Repeat until all primer-probe mixes have been loaded.
- Tap the plate gently on the benchtop to ensure all liquid is at the bottom of the wells.
- Cover the plate using optical adhesive film; use a scraper or roller to ensure that all edges and wells are sealed. Centrifuge the plate at 1000 x g for 1 - 2 minutes in a swinging bucket rotor fitted with plate holders to collect material at the bottom of the well.
- Using a quantitative PCR system, run the plate using the cycling conditions indicated in Table 2.
iv class="table reformat-table mobile">
Table 2. PCR Cycling Conditions
StageCyclesTemperature (ºC)Fast Cycling Time (min:sec)Standard Cycling Time (min:sec)Polymerase activation195.003:0003:00Amplification:
Denature
Anneal/extend40
95.0
60.0
0:05
0:30
0:15
1:00
Refer to the PIS for the analysis of your results (“B. ANALYSIS OF RESULTS”, page 5).
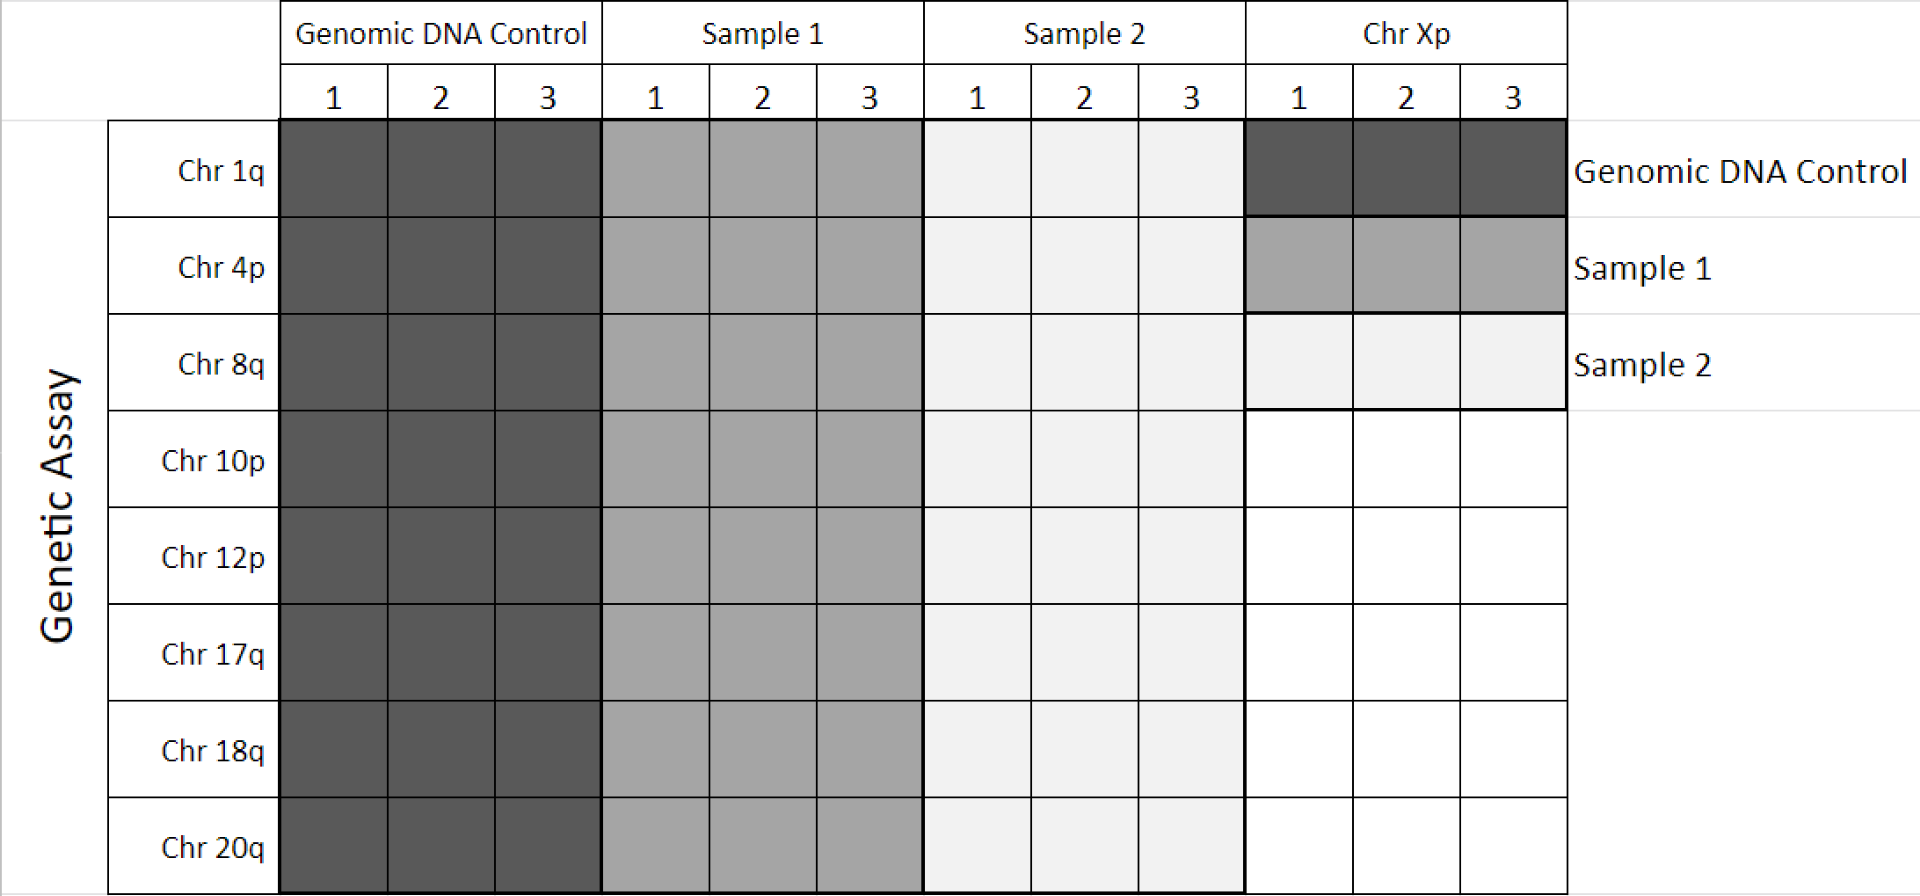
Suggested plate array for 3 samples (incl. Control DNA):

Request Pricing
Thank you for your interest in this product. Please provide us with your contact information and your local representative will contact you with a customized quote. Where appropriate, they can also assist you with a(n):
Estimated delivery time for your area
Product sample or exclusive offer
In-lab demonstration


