Cell Isolation with the Easy 250 EasySep™ Magnet
Manual cell isolations from large-volume samples, such as leukopaks and whole blood samples, can be scaled up using the Easy 250 EasySep™ Magnet with a standard T-75 cm2 cell culture flask and EasySep™ reagents. Learn the steps and the key considerations when using the T-75 cm2 flask with the Easy 250 EasySep™ Magnet. Please refer to the information below for T-75 cm2 flask compatibility with the Easy 250 EasySep™ Magnet as well as key technical considerations when using this magnet for manual cell isolation:
T-75 cm2 flask compatibility with the Easy 250 EasySep™ Magnet:
| Compatibility Status | Brand | Catalog # |
|---|---|---|
| Compatible (officially recommended) | Corning® | 353135 (plug-seal cap)/STEMCELL# 200-0500 353136 (vented cap)/STEMCELL# 200-0501 |
| Compatible (suitable alternative) | Greiner Bio-One | 658170 |
| Not compatible (not recommended) | BioLife (Thermo) | 130190 130193 |
| CellTreat® | 229340 229341 |
|
| VWR | 10062-862 10062-860 |
|
| Corning®/Falcon | 353110 |
Note: This table only includes the T-75 cm2 flasks for which compatibility has been tested. If your flask type is not listed above, we suggest performing a pilot experiment first to confirm the compatibility of that flask with our Easy 250 EasySep™ Magnet. The flask should allow proper mixing of volumes up to 250 mL with a serological pipette, and the flask neck should fit a 25 mL serological pipette to allow mixing and volume collection.
How to Isolate Immune Cells from Large-Volume Samples Using the Easy 250 EasySep™ Magnet
Adjusting the Base Platform Height to Fit the T-75 cm2 Flask Type That Will Be Used (01:31)
- Place the Easy 250 EasySep™ Magnet on a flat surface and ensure the spring loaded side is pushed in so that the T-75 cm2 flask can easily be inserted into the magnet.
- If this is the first time this magnet is being used with a particular type of flask, check if the base platform height needs to be adjusted. To do so,
- Place the T-75 cm2 flask in the magnet to determine how much the base platform height needs to be increased or lowered, if at all. Aim to have the flask shoulder flush with the top of the magnet surface such that the flask cap and neck are not hindered by the magnet.
- Once the correct height is determined, remove the flask.
- Place the magnet on its side and use a flathead screwdriver to adjust the height.
- To bring the flask base platform up, use the screwdriver to turn the drive bolt at the bottom of the magnet counterclockwise. To bring the platform down, turn the drive bolt clockwise. Take care not to over tighten the drive bolt.
- Once the base height is adjusted, place the flask back into the magnet to check if the shoulders of the T-75 cm2 flask are flush with the magnet surface.
- If needed, perform further adjustments of the drive bolt as required.
- Once adjustments are complete, place the magnet in the magnet stand to start the cell isolation protocol.
Cell Isolation Cocktail, Magnetic Particles (RapidSpheres™), and Buffer Addition (03:06)
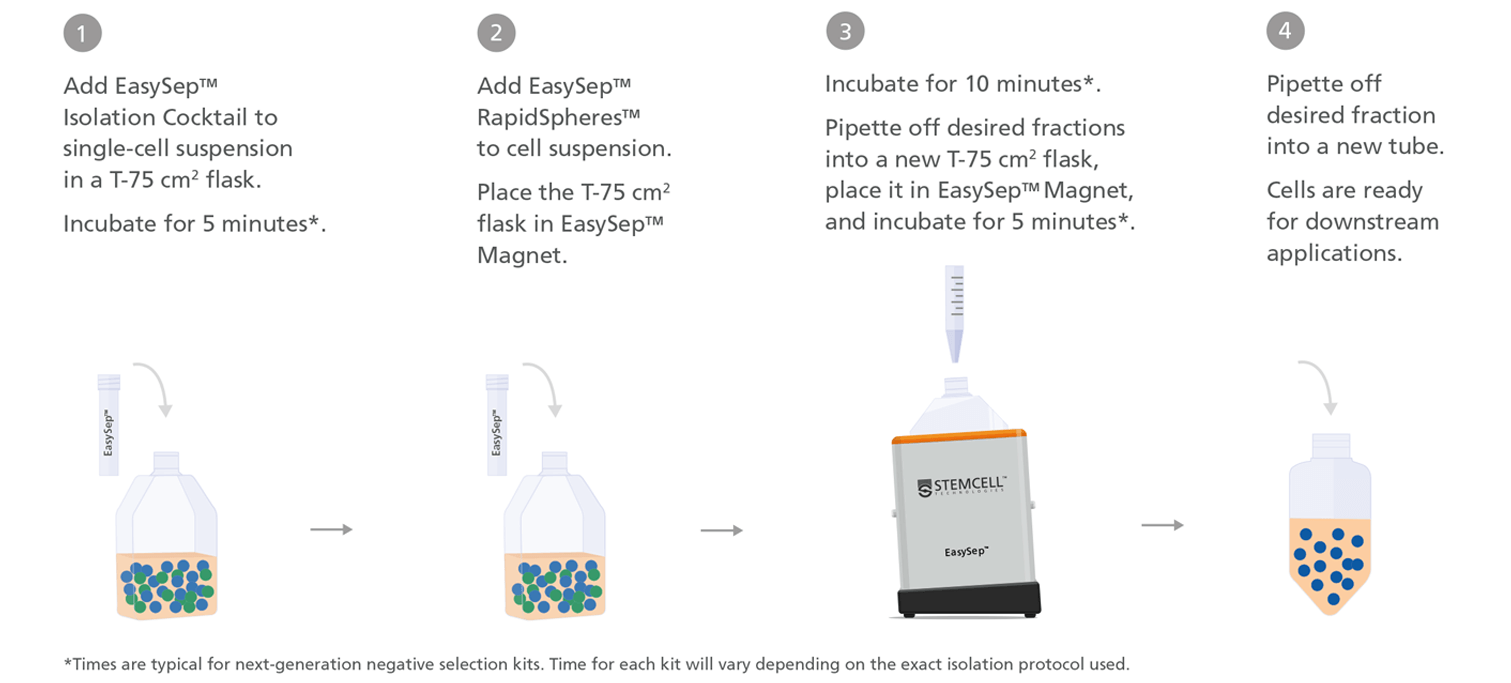
- Add cocktail at the volume indicated in the product information sheet (PIS) of the kit being used.
- Add the cocktail directly into the sample volume with a serological pipette and then gently pipette up and down 2 - 3 times.
- Cap the flask. Agitate and rotate it several times to thoroughly mix.
- Once the sample is mixed, incubate for the recommended time provided in the PIS.
- Vortex the magnetic particles for at least 30 seconds to ensure proper suspension. No deposit of particles should be seen at the bottom of the vial after vortexing.
- Once the cocktail incubation is complete, add the magnetic particles at the volume indicated in the PIS of the kit being used.
- Add the magnetic particles directly into the sample volume with a serological pipette and gently pipette up and down 2 - 3 times.
- Cap the flask. Agitate and rotate it several times to thoroughly mix.
- Once the sample is mixed, incubate for the recommended time provided in the PIS.
- Following incubation, add the EasySep™ Buffer or recommended buffer at the volume indicated in the PIS of the kit being used.
- Cap the flask. Agitate and rotate it several times to thoroughly mix.
- Once the sample is mixed, place the magnet on the stand and push the spring-loaded side of the magnet in so the flask can easily enter.
- Insert the flask in the magnet and push both buttons at the side so that the spring is released and the flask sits tightly in the magnet.
- Remove the cap and incubate the flask in the magnet for the indicated amount of time in the PIS.
Collecting the Supernatant (08:10)
Once the separation time has elapsed, the supernatant can be collected.
- When isolating cells with an EasySep™ negative isolation kit, the cells of interest will be present in the supernatant; therefore, the supernatant should be saved.
- When isolating cells with an EasySep™ positive selection kit, the cells of interest will be attached to the sides of the flask while seated in the magnet, therefore the supernatant can be discarded.
- To collect the supernatant, place a finger on the flask shoulder to stabilize it. Use a 25 mL serological pipette to aspirate the supernatant out of the flask since this will maximize the volume that can be drawn.
- When aspirating, position the pipette to draw from the center of the flask and start aspirating from the surface of the sample, moving down in a sweeping motion along the midline of the flask. Avoid touching the sides of the flask.
- Once the bulk of the volume is taken out, switch to a smaller serological pipette to draw up the residual volume.
- Once the residual volume is aspirated out, cap the T-75 cm2 flask and then push the spring side of the magnet so that the original flask can be retrieved.
Re-Suspending Labeled Cells Within the Flask (10:19)
When using an EasySep™ positive selection kit, the PIS will indicate that the positively selected cells need to be resuspended and the magnetic separation step repeated an indicated number of times. To do so:
- Use a larger serological pipette (e.g. 25 mL), and add the indicated volume of EasySep™ buffer to the flask. Alternate sides when dispensing the buffer into the flask. Thoroughly mix the flask's contents between each addition of buffer to resuspend.
- To completely resuspend cells from the edges of the flask, use a smaller serological pipette to target these cells for resuspension.
- Cap the flask. Agitate and rotate it several times to thoroughly mix.
- Immediately place the flask in the Easy 250 EasySep™ Magnet.
- Push both buttons at the side of the magnet so that the spring is released and the flask sits tightly in the magnet.
- Remove the cap and incubate the flask in the magnet for the amount of time indicated in the PIS.
- Note that these steps should be repeated the necessary number of times stated in the PIS.
- Once complete, the cells can be resuspended in a desired volume, such as 50 mL, which can then be transferred to a 50 mL tube to spin down for further downstream applications.
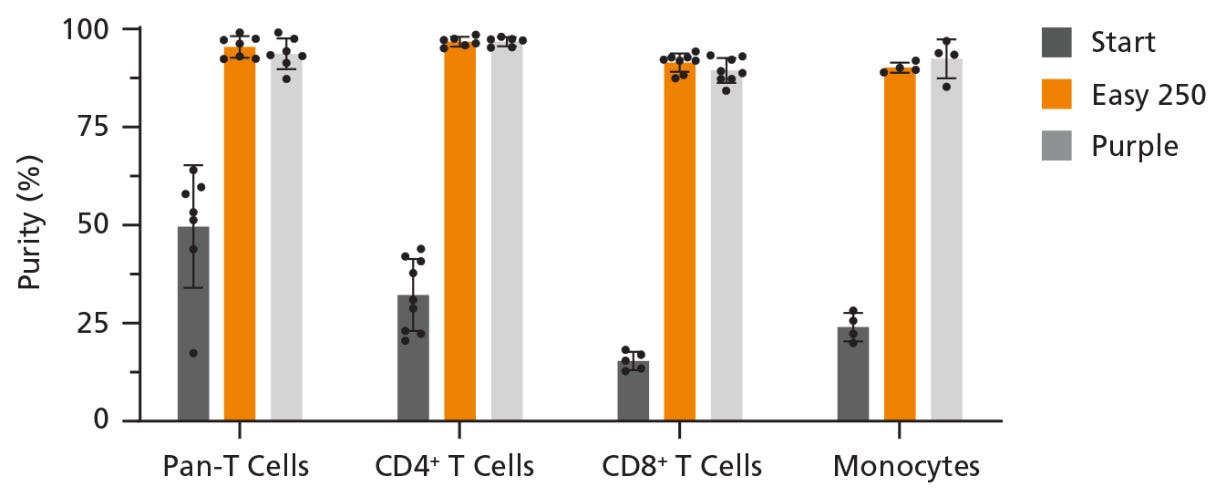
Figure 1. Using the Easy 250 EasySep™ Magnet Results in the Isolation of Highly Purified Cells of Interest
Human immune cells were isolated from processed leukopaks using the corresponding EasySep™ negative selection kits. Cell purity was measured before isolation (Start) and after isolation with the Easy 250 EasySep™ Magnet (Easy 250), EasySep™ Magnet (Purple). Purity was assessed by staining with cell surface markers for pan-T cells (CD3+), CD4+ T cells (CD3+CD4+), CD8+ T cells (CD3+CD8+), or monocytes (CD14+CD45+), and analyzed by flow cytometry. Data shown as mean ± SD; n = 4 - 12.
Explore the performance data >
For further assistance and information, please contact techsupport@stemcell.com.
STEMCELL Products for Cell Isolation from Large-Volume Samples
Additional Resources


Request Pricing
Thank you for your interest in this product. Please provide us with your contact information and your local representative will contact you with a customized quote. Where appropriate, they can also assist you with a(n):
Estimated delivery time for your area
Product sample or exclusive offer
In-lab demonstration

