Maintenance of Porcine Pluripotent Stem Cells (pPSCs) Using eTeSR™
This protocol describes a method for the maintenance and expansion of porcine pluripotent stem cells (pPSCs) using eTeSR™ with the addition of Activin A and XAV939. Using this method, pPSCs can be maintained and expanded long-term whilst displaying characteristic and homogeneous morphology, expressing markers of the undifferentiated state and retaining the ability to differentiate into all three germ layers. This method utilizes single-cell passaging on a 4 or 5 day flexible feeding schedule. Included within this document is guidance on how to successfully thaw, maintain and cryopreserve pPSC cultures.
To demonstrate the performance of this novel medium, comparative data is provided at the end of this document against a published formulation1 commonly used for the maintenance of pPSCs. Data shows that pPSCs maintained in eTeSR™ with Activin A and XAV939 can be passaged long-term demonstrating improved morphology, cell expansion and marker expression compared to the published formulation. pPSCs maintained in eTeSR™ with Activin A and XAV939 are also capable of trilineage differentiation showing efficient specification towards the three germ layers.
This protocol was developed and optimized using porcine embryonic stem cells (pESCs) provided by PluriCells (https://www.pluricells.co.uk).
Important Notes
- Upon thawing, an adaptation step is required if the pPSCs have been maintained in alternate cell culture media (e.g. N2B27 based media formulations, feeder-dependent cultures etc.). The time required to adapt sub-optimal cultures is variable and can be dependent on the severity, cell line being used and/or previous cell culture media used to maintain them.
- Using the single-cell passaging technique outlined in this protocol there is no manual removal of spontaneous differentiation required prior to passaging. However, some manual removal may be required upon thawing sub-optimal cultures or cultures previously kept in alternate cell culture media.
- Seeding density guidelines for passaging have been provided in Table 1. Note that biological variability of pPSC lines and choice of cell culture matrix may mean that seeding density optimization is required.
Materials
- Porcine embryonic stem cell lines e.g. pEpiSC 4, 7, 8 or 10 (PluriCells)
- eTeSR™ (Catalog #100-1215)
- Activin A (Catalog #78132.1)
- XAV939 (Catalog #72672)
- Bovine Albumin Fraction V (7.5% solution) (Fisher Scientific, CAT#11500496)
- Cell culture grade water (e.g. HyClone™ Water, Cell Culture Grade (Cytiva, CAT#10183152))
- Costar® 6-Well Flat-Bottom Plate, Tissue Culture-Treated (Catalog #38015)
- Costar® 12-Well Flat-Bottom Plate, Tissue Culture-Treated (Catalog #200-0624)
Part I: Preparation of Reagents and Materials
A. Reconstitution of Activin A
The following example is for preparing a 20 µg/mL stock solution of Activin A (1000 X) from a 100 µg vial. If preparing a stock solution from a different size vial (e.g. 10 µg, 500 µg or 1000 µg) adjust volumes accordingly.
- Prepare a 0.1% bovine serum albumin (BSA) solution.
For 7.5 mL add 100 µL 7.5% Bovine Albumin Fraction V to 7.4 mL cell culture grade water.
- Add 4 mL 0.1% BSA solution to a 15 mL conical tube.
- Briefly centrifuge Activin A vial, and add 1 mL 0.1% BSA solution directly to the vial by pipetting the solution down the sides of the vial. Mix by pipetting up and down gently, and transfer this to the 15 mL conical tube containing 4 mL 0.1% BSA solution and gently mix the solution with a 5 mL serological pipette. Do not vortex.
- After reconstitution, aliquot the stock solution into working volumes and store at -80°C for up to 3 months. Avoid repeated freeze-thaw cycles.
B. Reconstitution of XAV939
The following example is for preparing a 2 mM stock solution of XAV939 (1000X) from a 1 mg vial. If preparing a stock solution from a different size vial (e.g. 10 mg or 25 mg) adjust volumes accordingly.
- Briefly centrifuge XAV939 vial.
- Add 1.6 mL of DMSO by pipetting the solution down the sides of the vial. Mix the solution by pipetting up and down gently. Do not vortex.
- After reconstitution, aliquot the stock solution into working volumes and store at -20°C for up to 12 months. Avoid repeated freeze-thaw cycles.
C. Reconstitution of Y-27632
The following example is for preparing a 10mM stock solution of Y-27632 (1000X) from a 5 mg vial. If preparing a stock solution from a different size vial (e.g. 1 mg, 50 mg or 100 mg) adjust volumes accordingly.
- Briefly centrifuge Y-27632 vial.
- Add 1.56 mL of DMSO by pipetting the solution down the sides of the vial. Mix the solution by pipetting up and down gently. Do not vortex.
- After reconstitution, aliquot the stock solution into working volumes and store at -20°C for up to 12 months. Avoid repeated freeze-thaw cycles.
D. Preparation of complete eTeSR™
- Thaw eTeSR™ 10X Supplement at room temperature (15 - 25°C) or overnight at 2 - 8°C. Do not thaw in a 37°C water bath. Mix thoroughly by gently swirling or inverting the bottle. Do not shake.
NOTE: eTeSR™ 10X Supplement may appear slightly cloudy after thawing. This will not affect performance.NOTE: Once thawed, use immediately or aliquot and store at -20°C for up to 6 months. Do not exceed the shelf life of the supplement. After thawing the aliquots, use immediately. Do not re-freeze.
- Add 50 mL of eTeSR™ 10X Supplement to 450 mL of eTeSR™ Basal Medium. Mix thoroughly by swirling or gently inverting the bottle. Do not shake.
NOTE: If not used immediately, store complete eTeSR™ medium at 2 - 8°C for up to 2 weeks. Alternatively, aliquot and store at -20°C for up to 3 months. Do not exceed the shelf life of the individual components. After thawing the aliquoted complete medium, use immediately or store at 2 - 8°C for up to 2 weeks. Do not re-freeze.
E. Preparation of porcine pluripotent stem cell maintenance medium (pPSC Culture Medium)
The following example is for preparing 500 mL of pPSC Culture Medium. If preparing other volumes, adjust accordingly.
- To 500 mL of complete eTeSR add:
- 500 µL of the 20 µg/mL Activin A stock solution prepared in Part 1, Step A.
- 500 µL of the 2 mM XAV939 stock solution prepared in Part 1, Step B.
- Mix thoroughly by swirling or gently inverting the bottle. Do not shake.
F. Coating Cultureware with CellAdhere™ Laminin-521
The following example is for coating three wells of a 6-well plate with CellAdhere™ Laminin-521. If preparing additional wells or a different vessel scale volumes accordingly. If using other cell culture matrices please follow the individual manufacturer’s instructions.
- Thaw CellAdhere™ Laminin-521 at 2 - 8°C before use.
NOTE: If not used immediately, store at 2 - 8°C for up to 3 months.
- To prepare a 5 µg/mL CellAdhere™ Laminin-521 coating solution, add 24.2 µL of LN-521 to 7 mL of DPBS (Without Ca++ and Mg++) in a 15 mL conical tube.
NOTE: The required concentration of CellAdhere™ Laminin-521 can be cell dependent and should be optimized for each application. When adapting to the new culture matrix, cells may benefit from a higher concentration of CellAdhere™ Laminin-521 for the first few passages.
- To prepare a 2.5 µg/mL CellAdhere™ Laminin-521 coating solution, add 180 µL of CellAdhere™ Laminin-521 to 7 mL of DPBS (With Ca++ and Mg++) in a 15 mL conical tube.
- Mix thoroughly by gently pipetting up and down with a serological pipette.
- Add 2 mL of coating solution to the top three wells of a 6-well plate and swirl the plate to distribute the coating evenly.
- Seal the cultureware to prevent evaporation of the CellAdhere™ Laminin-521 solution (e.g. with Parafilm®). Incubate at 2 - 8°C overnight. If a more rapid coating is required, incubate at 37°C for at least 2 hours before use.
NOTE: If not used immediately, the cultureware can be stored at 2 - 8°C for up to 4 weeks after coating. Do not allow the culture surface to dry, as the matrix will become inactivated.
- Aspirate CellAdhere™ Laminin-521 when cells are ready to be plated.
NOTE: The coated wells do not require washing before use.
Part II: Thawing cryopreserved pPSCs into pPSC Culture Medium
The following example provides a protocol to thaw one vial of pPSCs either cryopreserved using the protocol in Part IV or from one vial of pESCs provided by PluriCells. The thawing process may need to be optimized depending on a number of factors including which culture system was used prior to cryopreservation, the number of cells to be thawed, the cryopreservation reagent etc.
- Allow a LN-521-coated 6-well plate to warm to ambient temperature (Part I-F).
- Combine 8 mL of pPSC Culture Medium with 8 µL of 10 mM Y-27632 in a 15 mL conical tube and mix by inverting. Add 2 mL to each well of the plate prepared in step 1. Keep the remaining medium for later in the protocol.
- Add 4 mL of pPSC Culture Medium without Y-27632 to a new conical tube.
- Remove the cryovial from liquid nitrogen and wipe the outside of the vial of cells with 70% ethanol or isopropanol.
- In a biosafety cabinet, twist the cap a quarter-turn to relieve internal pressure, then retighten.
- Quickly thaw cells in a 37°C water bath by gently swirling the vial. Remove the vial when a small frozen cell pellet remains. Do not vortex the cells.
- Wipe the outside of the vial with 70% ethanol or isopropanol.
- Use a 1 mL pipette to slowly transfer the contents of the cryovial to the 15 mL conical tube prepared in step 3.
- Centrifuge the tube at 300 x g for 5 minutes.
- Carefully aspirate the supernatant using a serological pipette leaving a small amount of medium to ensure the cell pellet is not disturbed. Gently flick the tube 3-5 times to resuspend the cell pellet.
- Resuspend in 1 mL of pPSC Culture Medium containing 10 µM Y-27632 prepared in step 2 and perform a cell count if desired.
- Seed the cells from the cell suspension directly into the plate. Seeding density is cell line dependent, but a range of 100,000 - 250,000 viable cells per well of a 6-well plate is recommended post thaw. Alternatively, if a viable cell count has not been performed seed 500 µL, 300 µL and 200 µL from the cell suspension directly into the three wells prepared in step 2.
- Disperse the cells throughout the wells by gently rocking the plate in short, back-and-forth and side-to-side motions to evenly distribute the cells across the surface. Gently place in the incubator at 39°C and 5% CO2. Do not disturb the plate for 24 hours.
- Perform a complete medium change after 24hrs to remove the Y-27632.
- Full medium changes may be performed daily or on a restricted feed schedule (See Table 2 for details on feed schedules). Passage the cells when they reach ~70-95% confluence.
Part III: Routine single-cell passaging of pPSCs using pPSC Culture Medium
This section outlines a protocol to perform routine single-cell passaging of pPSCs using pPSC Culture Medium on LN-521 coated plates. The protocol utilizes a weekend free 4/5/5 day flexible feeding schedule (Table 2). Using this protocol, pPSCs can be maintained long-term in an undifferentiated state. Once the cells reach either 30 passages or 20 weeks in culture it is recommended that a new vial from a well characterized cell bank is thawed.
- Allow a LN-521-coated 6-well plate to warm to ambient temperature (Part I-F).
- Combine 10 mL of pPSC Culture Medium with 10 µL of 10 mM Y-27632 in a 15 mL conical tube and mix by inverting. Add 2 mL to each well of the plate prepared in step 1. Keep the remaining medium for later in the protocol.
- Prepare a 15 mL conical tube with 2 mL of pPSC Culture Medium per well to be passaged.
- Aspirate spent medium from wells to be passaged then add 1 mL ACCUMAX™ per well and incubate at 39°C for approximately 12-15 minutes.
NOTE: Incubation times may vary depending on variables including cell line, coating matrix and confluence. After 12 minutes the culture can be observed under the microscope. Cells should appear round and shiny, with little-to-no dark, flat patches. When this has been achieved the cells are ready to be detached.NOTE: One well of a 6-well plate at a confluence of ≥ 80% will typically yield approximately 2-3 x 10⁶ viable cells. Additional wells can be harvested if more cells are required.
- Using a P1000 pipette, detach cells from the surface of the well by tilting the plate and spraying directly onto the well surface, starting at the top of the well and working down.
NOTE: If cells do not detach easily, return the plate to the incubator for a further 5 minutes and monitor under the microscope.
- Transfer the cell suspension to the 15 mL conical tube prepared in step 3.
- Centrifuge the tube at 300 x g for 5 minutes.
- Carefully aspirate the supernatant, leaving a small amount to ensure the cell pellet is not disturbed. Gently flick the tube 3-5 times to resuspend the cell pellet.
- Resuspend in approximately 2 mL pPSC Culture Medium containing 10 µM Y-27632 (prepared in step 2) per well harvested and count cells using an appropriate method e.g. a hemocytometer with cells counterstained for Trypan Blue or an automated cell counting system.
NOTE: The resuspension volume can be adjusted depending on the confluency of the well harvested to allow more efficient counting. We recommend a typical resuspension volume of 2-4 mL for one well of a 6-well plate.
- Once a cell count has been performed, seed the appropriate volume of cell suspension into the 6-well plate prepared in step 2.
NOTE: Refer to Table 1 below for recommended cell numbers for seeding. It is recommended to seed a range of densities as optimal cell seeding densities may differ by cell line.
- Disperse the cells throughout the wells by gently rocking the plate in short, back-and-forth and side-to-side motions to evenly distribute the cells across the surface. Gently place in the incubator at 39°C and 5% CO2. Do not disturb the plate for 24 hours.
- Perform a complete medium change after 24hrs to remove the Y-27632.
- Full medium changes may be performed daily or on a restricted feed schedule (See Table 2 for details on feed schedules). Passage the cells when they reach ~70-95% confluence.
Table 1. Recommended Seeding Densities for Routine Single-Cell Culture
| DAYS TO REACH CONFLUENCE | EXAMPLE NUMBER OF CELLS SEEDED PER WELL OF A 6-WELL PLATE (~10 cm2) |
||
|---|---|---|---|
| LOW DENSITY | MEDIUM DENSITY | HIGH DENSITY | |
| 4 DAYS | 2 x 10⁴ | 5 x 10⁴ | 8 x 10⁴ |
| 5 DAYS | 1 x 10⁴ | 2 x 10⁴ | 4 x 10⁴ |
Table 2. Recommended Feeding Schedule for a 4/5/5 Day Passage Schedule
| Week 1 | MONDAY | TUESDAY | WEDNESDAY | THURSDAY | FRIDAY | SATURDAY | SUNDAY |
|---|---|---|---|---|---|---|---|
| Passage* | Feed | - | Feed | Passage** | Feed | - | |
| Week 2 | MONDAY | TUESDAY | WEDNESDAY | THURSDAY | FRIDAY | SATURDAY | SUNDAY |
| Feed | - | Passage** | Feed | Double Feed | - | - |
*Cells seeded to reach confluency in 4 days
**Cells seeded to reach confluency in 5 days
Part 4: Cryopreservation of pPSC cultures using FreSR-S
The following are instructions for cryopreserving cultures grown in pPSC Culture Medium in 6-well plates. If using other cultureware, adjust volumes accordingly. Cultures should be cryopreserved when they reach the recommended passaging confluency.
- Prepare appropriate number of cryovials and label with permanent marker or printed cryopreservation-suitable labels (e.g. Brady® Freezerbondz™, Merck Cat:Z664529)
- Prepare a 15 mL conical tube with 2 mL of pPSC Culture Medium per well to be cryopreserved.
- Aspirate spent medium from wells to be cryopreserved then add 1 mL ACCUMAX™ per well and incubate at 39॰C for approximately 12-15 minutes.
NOTE: Incubation times may vary depending on variables including cell line and confluence. After 12 minutes the culture can be observed under the microscope. Cells should appear round and shiny, with little-to-no dark, flat patches. When this has been achieved the cells are ready to be detached.NOTE: One well of a 6-well plate at a confluence of ≥ 80% will typically yield approximately 2-3 x 10^6 viable cells. Additional wells can be harvested if more cells are required.
- Using a P1000 pipette, detach cells from the surface of the well by tilting the plate and spraying directly onto the well surface, starting at the top of the well and working down.
NOTE: If cells do not detach easily, return the plate to the incubator for a further 5 minutes and monitor under the microscope.
- Transfer the cell suspension to the 15 mL conical tube prepared in step 3.
- Count cells using an appropriate method e.g. a hemocytometer with cells counterstained for Trypan Blue or an automated cell counting system.
- Centrifuge the tube at 300 x g for 5 minutes.
- Carefully aspirate the supernatant, leaving a small amount to ensure the cell pellet is not disturbed. Gently flick the tube 3-5 times to resuspend the cell pellet.
- Add cold (2 - 8°C) FreSR™-S to obtain a cell suspension of 1 x 10⁶ cells/mL and mix thoroughly.
- Transfer 0.5 mL of the single-cell suspension to each cryovial.
- Cryopreserve the cells using either:
- A standard slow rate-controlled cooling protocol that reduces temperatures at approximately -1॰C/min, followed by long-term storage at -135॰C (Liquid nitrogen) or colder. Long-term storage at -80॰C is not recommended.
- A multi-step protocol where cells are kept at -20॰C for 2 hours, followed by -80॰C for 2 hours, followed by long-term storage at -135॰C (Liquid nitrogen) or colder.
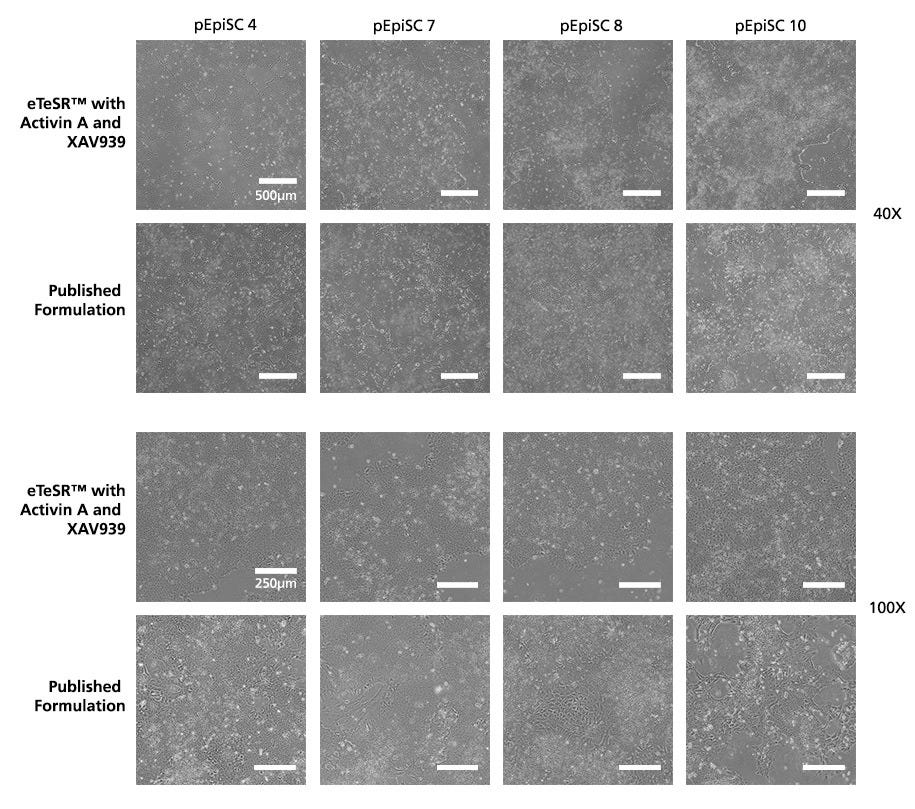
Figure 1. pPSC Cultures Maintained in eTeSR™ supplemented with Activin A and XAV939 Demonstrate Improved Cellular Morphology Compared To A Published Formulation
Phase contrast images show representative cellular morphology of pPSCs maintained in either eTeSR™ with Activin A and XAV939 or a published formulation. Four cell lines were maintained using single-cell passaging for 10 weeks. pPSCs maintained in eTeSR™ supplemented with Activin A and XAV939 display characteristic PSC morphology that is more consistent and homogeneous compared to the published formulation.
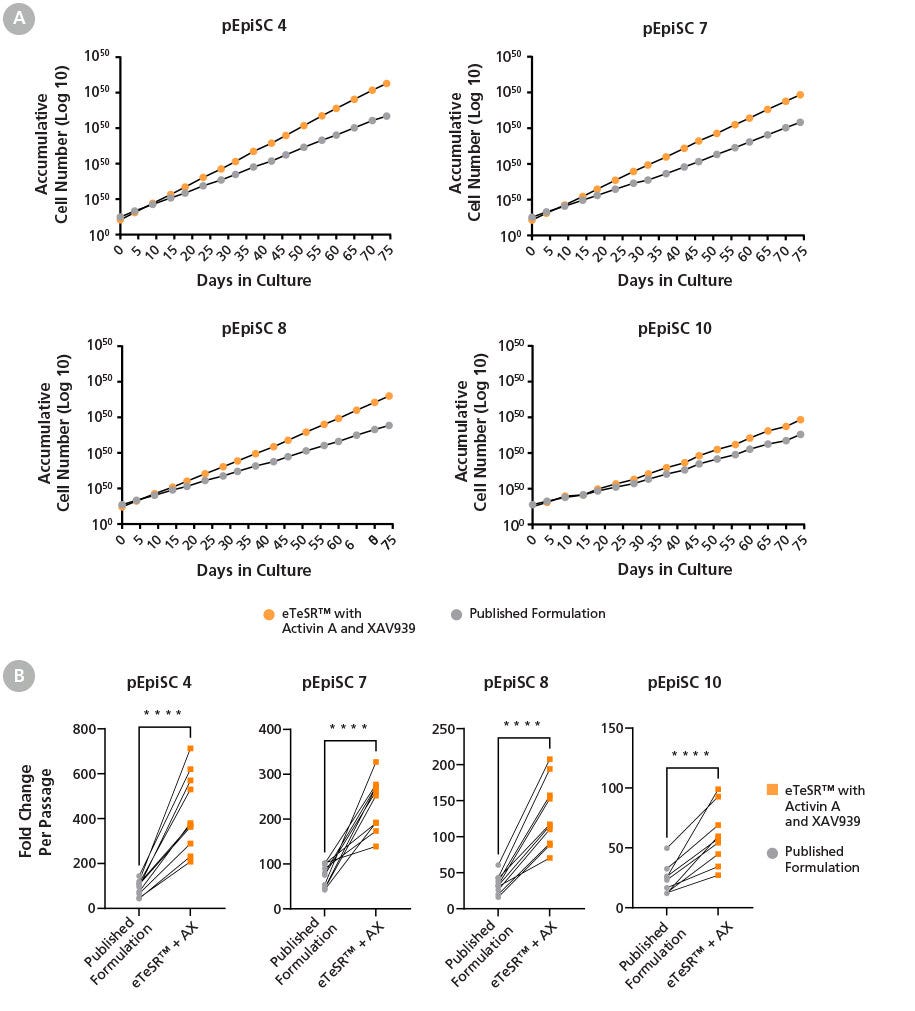
Figure 2. pPSCs Maintained in eTeSR™ Supplemented with Activin A and XAV939 Display Increased Growth Rates Compared To A Published Formulation
(A) Line graphs show accumulative cell number over 10 weeks of culture. pPSC lines maintained in eTeSR™ supplemented with Activin A and XAV939 demonstrate improved expansion compared to a published formulation. pPSC cultures were passaged on a 4-5-5 day schedule using restricted feeding. Control pPSC cultures were maintained on the same 4-5-5 day schedule and fed daily. (B) Line graphs show differences in expansion at each day 5 passage, pPSCs maintained in eTeSR™ supplemented with Activin A and XAV939 showed a significant increase in expansion compared to the published formulation.
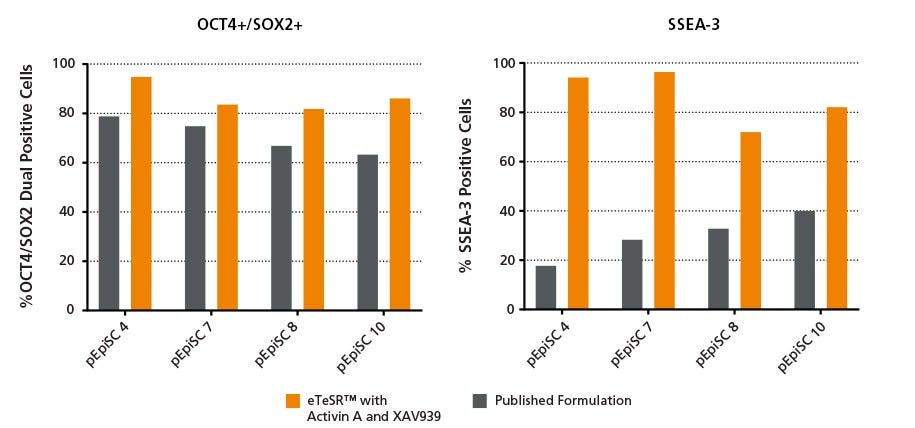
Figure 3. pPSCs Maintained in eTeSR™ Supplemented with Activin A and XAV939 Retain Undifferentiated Marker Expression Throughout Long-Term Passaging
Bar charts show the percentage of undifferentiated pPSCs present after 10 weeks of culture in either eTeSR™ Supplemented with Activin A and XAV939 or the published formulation. pPSCs were stained with antibodies targeting either OCT4, SOX2 or SSEA3 then analyzed by flow cytometry. pPSCs maintained in eTeSR™ Supplemented with Activin A and XAV939 displayed higher percentages of both OCT4/SOX2 dual positive cells and SSEA3 positive cells compared to the published formulation. The increased percentages of SSEA3 positive cells demonstrates the improved maintenance of the undifferentiated state when using eTeSR™ Supplemented with Activin A and XAV939.

Figure 4. pPSCs Maintained in eTeSR™ Supplemented with Activin A and XAV939 Demonstrate Pluripotency Through Functional Differentiation Towards The Three Germ Layers
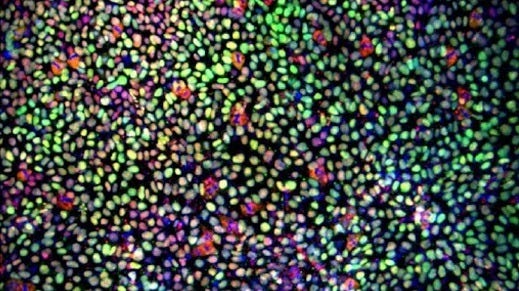
(A) Scatter dot plots show relative gene expression of pPSC lines differentiated towards the three germ layers; ectoderm (PAX6 and SOX1), mesoderm (MSGN1 and TBXT) and endoderm (FOXA2 and SOX17). All pPSC lines show upregulation of lineage specific markers and down-regulation of undifferentiated markers (NANOG, OCT4 and SOX2) normalized to an undifferentiated control sample.
(B) Immunocytochemistry images showing efficient differentiation of the pPSC line pEpiSC 7 towards the three germ layers. Each lineage is compared to an undifferentiated control to show the down-regulation of undifferentiated marker OCT4 and up-regulation of lineage specific markers PAX6 (ectoderm), TBXT (mesoderm and SOX17 (endoderm).
Request Pricing
Thank you for your interest in this product. Please provide us with your contact information and your local representative will contact you with a customized quote. Where appropriate, they can also assist you with a(n):
Estimated delivery time for your area
Product sample or exclusive offer
In-lab demonstration

