Mouse Pancreatic Exocrine Organoid Culture: Supplementary Protocols
This Technical Bulletin provides supplementary protocols for PancreaCult(tm) Organoid Growth Medium (Mouse), including organoid initiation and passaging from single cells and culturing pancreatic exocrine organoids in a dilute matrix suspension. This document also includes general recommendations and photographs that illustrate key steps of pancreatic exocrine organoid culture.
- Document # 27088
- Version 1.0.0
- Dec 2017
The following are supplementary protocols for the culture of pancreatic exocrine organoids with PancreaCult™ Organoid Growth Medium
(Mouse) (Catalog #06040). For complete culturing methods, use this document in coordination with the Product Information Sheet
(PIS; Document #10000003512), which includes a full materials list and step-by-step instructions for isolating tissue fragments from a mouse
pancreas, culturing pancreatic exocrine organoids in Corning® Matrigel® domes and passaging cultures as organoid fragments.
This table summarizes the available protocols for culturing pancreatic exocrine organoids in PancreaCult™ Organoid Growth Medium (Mouse)
and where the detailed protocols can be located. Within this table, “Tech Bul.” refers to this document (DX27088) and “PIS” refers to the
Product Information Sheet (Document #10000003512).

1 General Recommendations for Pancreatic Organoid Culture
1.1 Pre-wetting Plasticware
Conical tubes and serological pipettes that come in contact with
pancreatic tissue should be pre-wetted, as pancreatic tissue
frequently adheres to their surfaces, significantly reducing organoid
yield. Pre-wet tubes and pipettes on the day of the experiment.
To pre-wet 15 mL conical tubes, add 5 mL of Anti-Adherence
Rinsing Solution (Catalog #07010) and swirl to thoroughly coat
the tube. Transfer the Anti-Adherence Rinsing Solution to the next
tube and repeat until all required tubes have been coated. Repeat
these rinsing steps with the same volume of Advanced DMEM/F-12
(Thermo Fisher #12634010). To pre-wet 50 mL conical tubes, use
the same procedure with 30 mL of each solution. Tubes may be
capped and stored at room temperature (15 - 25°C) until use. To
pre-wet serological pipettes and pipette tips, add 10 mL of Anti-
Adherence Rinsing Solution to one 15 mL conical tube and 10 mL
of Advanced DMEM/F-12 to a second 15 mL tube. Rinse the pipette
or pipette tip with the two solutions in sequence immediately
before use.
1.2 Recommendations for Seeding Density
For best results it is recommended to seed pancreatic tissue
fragments harvested from one mouse pancreas (as per the PIS) into
12 wells (one 30 μL Matrigel® dome per well), or into 5 wells of
5,000 cells/well harvested from ¼ of a mouse pancreas if seeding
cultures as single cells, as per Section 2.1 (below). Once organoids
are established (p1+), seed organoid cultures with 200 organoid
fragments (PIS Section B) or 5,000 - 10,000 single cells per 30 μL
Matrigel® dome (Section 2.2 below).
It is crucial not to over seed the organoid cultures. If too much
starting material is embedded in a Matrigel® dome, organoids
cannot expand properly and the structural stability of the matrix
can be compromised.
1.3 When to Passage Pancreatic Exocrine Organoids
Organoid cultures are typically ready to passage every 4 - 7 days
during primary culture (p0) or 3 - 5 days after passaging (p1+).
Passage organoids as soon as the lumens of the organoids begin to
darken as the optimal time to passage may vary between cultures
and is dependant on several factors including seeding density and
the originating animal. If the majority of organoids are smaller
than 100 μm and exhibit clear lumens, return the culture to the
incubator for an additional day of culture.
If the majority of organoids contain darkened lumens or are
collapsed (Figures 1C and 2C), the culture may still be recovered
through passaging. During fragment enumeration, be careful to
only count organoid fragments and not single cells (Figure 3) and
seed the passaged culture with 200 fragments per well. Darkened
and collapsed cultures may also be recovered through single-cell
passaging (Section 2.2 below) as it enables selective expansion of
the healthy stem cell population.
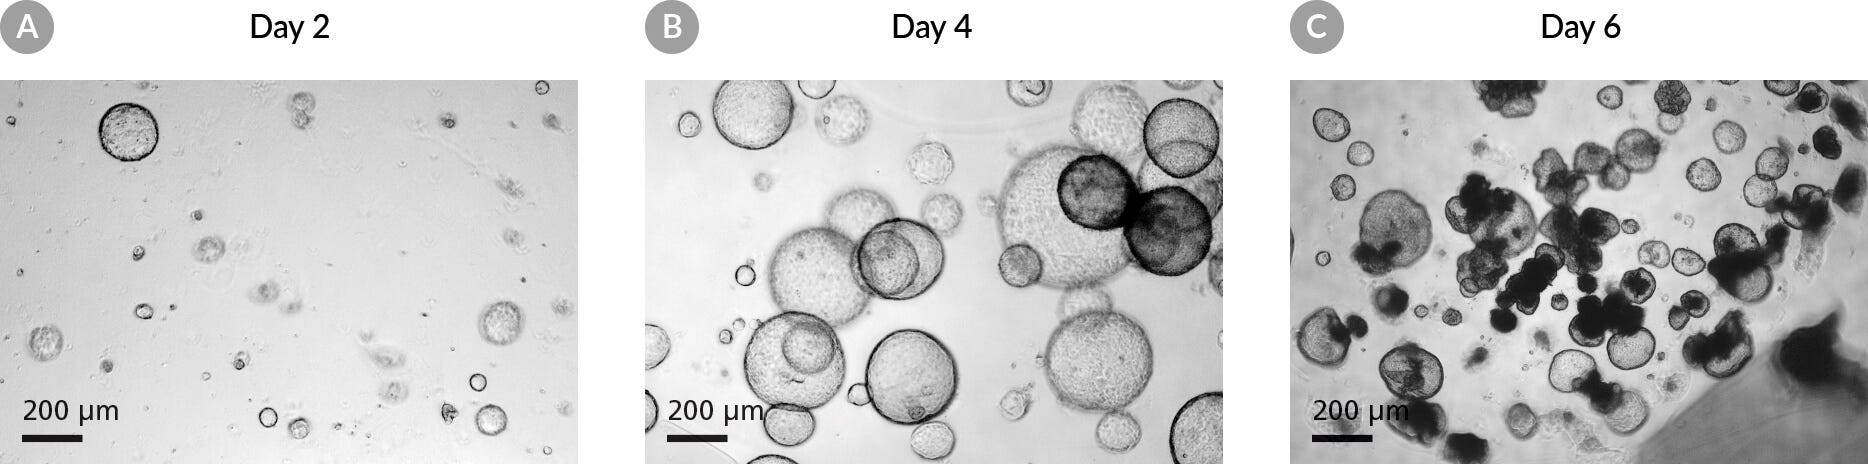
Figure 1. Pancreatic Organoids Grown in PancreaCult™ Organoid Growth Medium (Mouse) Plated in Matrigel® Domes.
(A) The majority of pancreatic organoids are still less than 100 μm in diameter, exhibit clear lumens and are not yet ready for passaging. (B) The majority of organoids are larger than 100 μm and the lumens of a few organoids have turned dark. These cultures are ready to be passaged. (C) Organoids have passed the typical passage window; the lumens of most organoids have darkened and many organoids have collapsed.
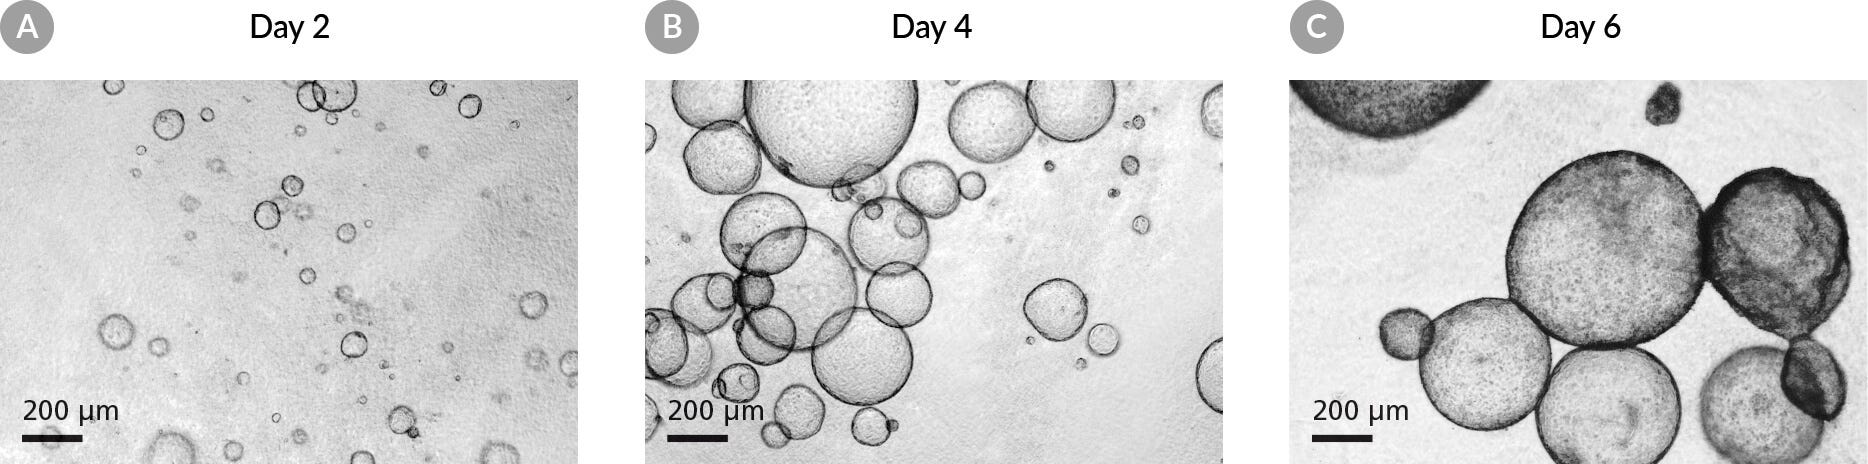
Figure 2. Pancreatic Organoids Grown in PancreaCult™ Organoid Growth Medium (Mouse) Plated in a Dilute Matrigel® Suspension.
(A) The majority of pancreatic organoids are still less than 100 μm in diameter, exhibit clear lumens and are not yet ready for passaging. (B) The majority of organoids are larger than 100 μm and the lumens of a few organoids have turned dark. These cultures are ready to be passaged. (C) Organoids have passed the typical passage window; the lumens of most organoids have darkened and some organoids have collapsed.
1.4 Mechanical Trituration and Enumeration of Organoid Fragments
Expanded organoids are mechanically triturated during passaging and the resulting organoid fragments should be smaller than 100 μm (Figure 3A). If the majority of fragments are larger than 100 μm (Figure 3B), continue trituration to further break up fragments before organoid fragment enumeration. When counting organoid fragments for plating, count only those that are smaller than 100 μm and be careful not to count single cells (Figure 3C).
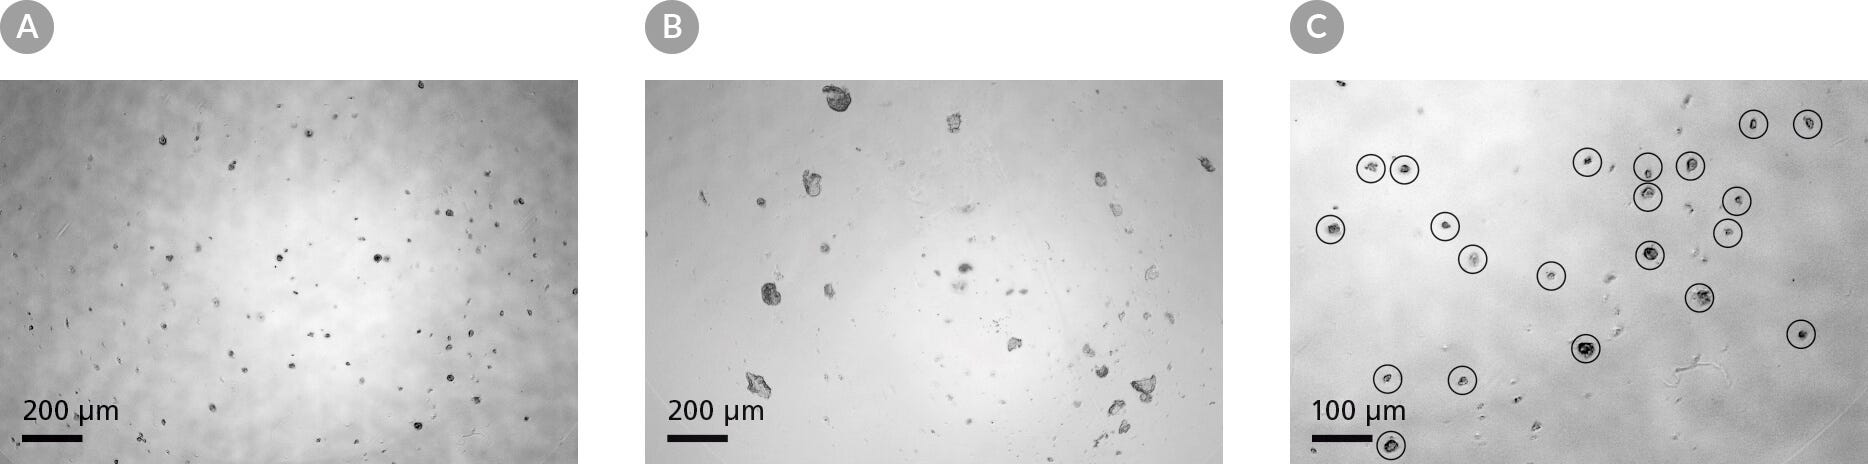
Figure 3. Pancreatic Organoids are Broken Down to 100 μm Fragments for Passaging.
(A) Mechanical disruption of organoids during passaging should produce organoid fragments between 30 - 100 μm in diameter. (B) Organoid fragments larger than 100 μm should be further triturated until they are 30 - 100 μm in diameter. (C) During enumeration, count fragments (circled) and ignore single cells.
2 Dissociating Primary Pancreatic Tissue into Single Cells
2.1 Dissociating Primary Pancreatic Tissue into Single Cells
- Prepare complete PancreaCult™ Organoid Growth Medium (Mouse); refer to the PIS. When initiating or passaging pancreatic exocrine organoids as single cells, supplement complete PancreaCult™ Organoid Growth Medium (Mouse) with 10 μM Y-27632 (Catalog #72302).
- Prepare the DNase I + TrypLE™ solution by adding 50 μL of 1 mg/mL DNase I Solution (Catalog #07469) to 4 mL of TrypLE™ Express Enzyme (Thermo Fisher #12605010). Mix thoroughly and store on ice.
- Process a single mouse pancreas to obtain appropriate tissue fragments as described in steps A.1 - 14 of the PIS. The following instructions pertain to proceeding with ¼ of the pancreatic material harvested and pooled in the supernatant at the end of step A.14.
- Centrifuge the tube at 290 x g for 5 minutes. Aspirate as much of the supernatant as possible without disturbing the pellet, leaving ~5 - 10 μL in the tube.
- Add 1 mL of DNase I + TrypLE™ to the pellet (prepared in step 2.1.2). Using a 1000 μL pre-wetted pipette tip, pipette up and down 5 times to resuspend the pellet. Add additional DNase I + TrypLE™ to a total volume of 4 mL. Place in a 37°C water bath for 10 minutes to dissociate the collected tissue fragments into single cells.
- Using a 5 mL pre-wetted serological pipette, pipette the single-cell suspension up and down 5 times. Add 8 mL of Advanced DMEM/F-12.
- Centrifuge at 290 x g for 5 minutes at 2 - 8°C. Aspirate as much of the supernatant as possible without disturbing the pellet, leaving ~5 - 10 μL in the tube.
- Using a 10 mL pre-wetted serological pipette, add 5 mL of Advanced DMEM/F-12 and resuspend the pellet by pipetting up and down 5 times.
- Pass the cell suspension through a pre-wetted 37 μm Reversible Strainer attached to a 15 mL conical tube and collect the flow-through. Rinse the tube that contained the cell suspension with 2.5 mL of Advanced DMEM/F-12 and pass the rinse through the strainer into the same tube. Discard the strainer.
- Using a hemocytometer, perform a cell count to estimate the number of cells in suspension.
- Add 5000 cells to each of 5 pre-wetted 15 mL conical tubes, each containing 1 mL of cold Advanced DMEM/F-12. Aliquot cells carefully as it is important not to over seed the cultures (See Section 1.2 above).
- Centrifuge tubes at 290 x g for 5 minutes. Aspirate as much of the supernatant as possible without disturbing the pellets, leaving ~5 - 10 μL in the tubes. Place tubes on ice.
- Plate pancreatic progenitor cells according to steps A.20 - 29 of the PIS for culture in Matrigel® domes or steps 3.1.6 - 3.1.15 to culture cells in a dilute Matrigel® suspension (below).
2.2 Dissociating Pancreatic Exocrine Organoids Cultured in Matrigel® Domes into Single Cells
- Process Matrigel® domes as described in steps B.1 - 9 of the PIS.
- Centrifuge the tube at 290 x g for 5 minutes. Without disturbing the pellet, carefully aspirate the supernatant, leaving ~5 - 10 μL in the tube.
- Add 500 μL of Gentle Cell Dissociation Reagent (Catalog #07174) to the pellet and pipette up and down 5 - 10 times to mix. Place in a 37°C water bath for 10 minutes to dissociate organoid fragments into single cells.
- Add 500 μL of Advanced DMEM/F-12 to the tube.
- Centrifuge the tube at 290 x g for 5 minutes. Aspirate as much of the supernatant as possible without disturbing the pellet, leaving ~5 - 10 μL in the tube.
- Add 1 mL of cold Advanced DMEM/F-12 to resuspend the pellet. Using a hemocytometer, perform a cell count to estimate the number of cells in suspension.
- Add 5000 - 10,000 cells per well to be seeded to the corresponding number of 15 mL conical tubes, each containing 1 mL of cold Advanced DMEM/F-12. Aliquot cells carefully, as it is important not to over seed the cultures (See Section 1.2).
- Centrifuge tube(s) at 290 x g for 5 minutes. Without
disturbing the pellet, carefully aspirate as much of the
supernatant as possible, leaving ~5 - 10 μL in the tube.
Place tube(s) on ice.
NOTE: The pellet is often not visible. - For subsequent steps in the passaging protocol, refer to steps A.20 - 29 of the PIS.
3 Initiation and Passaging of Pancreatic Exocrine Organoid Cultures in a Dilute Matrigel® Suspension
In addition to culture in Matrigel® domes, pancreatic exocrine organoids may be cultured in a dilute Matrigel® suspension. When cultured in suspension, Matrigel® forms a semi-solid ‘cloud’ that loosely encapsulates the growing organoids. Growth in suspension allows the scale-up of cultures beyond what may be practical when plating in Matrigel® domes. Such scale-up is possible due to the elimination of medium changes, decreased reliance on the physical stability of the Matrigel®, and a plating technique that is more amenable to high-throughput work-flows. Compared to organoids grown in Matrigel® domes, organoids grown in a dilute Matrigel® suspension are typically ready for passage earlier, usually within 3 - 6 days, and can be maintained in culture through passaging or cryopreserved for future experiments.
3.1 Initiating Pancreatic Exocrine Organoid Cultures in a Dilute Matrigel® Suspension
- Place a wrapped 12-well plate for suspension culture (Greiner Bio-One #665102) at 2 - 8°C for at least 10 minutes. Place boxes of sterile 1000 μL and 200 μL pipette tips at 2 - 8°C.
- Thaw 500 - 1000 μL of Matrigel® on ice.
- Prepare complete PancreaCult™ Organoid Growth Medium (Mouse) and place on ice. For complete instructions refer to the PIS.
- Prepare Tissue Dissociation Cocktail (see PIS). Warm to room temperature (15 - 25°C).
- Process mouse pancreatic tissue to harvest duct fragments as described in steps A.4 - 19 in the PIS or follow section 2.1 Dissociating Primary Pancreatic Tissue into Single Cells (above).
- Using a cooled pipette tip, add 100 μL of thawed Matrigel® to 900 μL of cold PancreaCult™ Organoid Growth Medium (Mouse) in a 15 mL conical tube for each well to be plated (example if plating 10 wells, the tube should contain 1 mL of Matrigel® combined with 9 mL of cold PancreaCult™ Organoid Growth Medium (Mouse)). Mix thoroughly and store on ice.
- Place the cooled 12-well plate on ice and add 950 μL of the Matrigel®/PancreaCult™ mixture (prepared in step 3.1.6) to each well to be plated.
- Process one tube/pellet from step A.19 at a time, as described below. Work quickly after adding Matrigel® to the pellet to ensure the Matrigel® does not solidify.
- Using a pipettor with a cooled 200 μL pipette tip, add 50 μL of the Matrigel®/PancreaCult™ mixture (prepared in step 3.1.6) on top of the pellet.
- Gently mix the suspension by pipetting up and down 5 - 8 times. Pipette only to the first stop to avoid introducing air bubbles.
- Pipette the entire suspension into 1 well of the 12-well plate containing 950 μL of the Matrigel®/PancreaCult™ mixture (prepared in step 3.1.7). Gently agitate plate to mix contents of the well.
- Repeat steps 3.1.9 - 11 for the remaining tubes, adding the 50 μL Matrigel®/PancreaCult™ cell suspension into a fresh well already containing 950 μL of the Matrigel®/PancreaCult™ mixture.
- Place the lid on the culture plate. Place plate on an orbital shaker set to 80 rpm in a 37°C incubator with 5% CO2.
- At 10 minutes after seeding the wells, capture one 2X image
per well using a brightfield microscope (Day 0 images).
Carefully return plate to incubator.
NOTE: Once cultures have been placed on an orbital shaker, the Matrigel® added to each well will often form a semi-solid ‘cloud’ in which fragments are encapsulated. - Take photos of the wells every other day, or at desired time points, to track the growth of organoids until they are passaged. No medium changes are necessary.
3.2 Passaging Pancreatic Exocrine Organoids in a Dilute Matrigel® Suspension
- Place a wrapped 12-well plate for suspension culture at 2 - 8°C for at least 10 minutes (Greiner Bio-One #665102). Place boxes of sterile 1000 μL and 200 μL pipette tips at 2 - 8°C.
- Thaw Matrigel® on ice (~110 μL/well to be passaged).
- Prepare complete PancreaCult™ Organoid Growth Medium (Mouse) (see PIS). Place on ice.
- Using a 1000 μL pipettor, determine the volume of the
contents of each well. Set the pipettor to this volume, then
vigorously pipette the mixture up and down 30 times, taking
care to minimize the generation of bubbles.
NOTE: This results in mechanical breakdown of pancreatic organoids and Matrigel® into smaller fragments of 30 - 100 μm. Check fragment sizes using a light microscope; if most fragments are larger than 100 μm, triturate until they are ≤ 100 μm (see Section 1.4). - If passaging multiple wells, combine the contents of all wells into a single 15 mL conical tube. If passaging a single well, transfer the entire volume of the well into one 15 mL conical tube.
- To prepare organoid fragments for plating, refer to steps B.9 - 12 of the PIS. To prepare single cells for plating, refer to steps 2.2.2 - 2.2.8.
- For subsequent steps in the passaging protocol, refer to steps
3.1.6 - 3.1.15.
NOTE: Monitor pancreatic exocrine organoids daily. Organoids seeded with 200 fragments typically require passaging every 3 - 6 days; after the initial passage, use a 1:10 to 1:30 split ratio in subsequent passages.
4 Cryopreservation of Mouse Pancreatic Exocrine Organoids
- Place Advanced DMEM/F-12 and CryoStor® CS10 (Catalog #07930) in a biosafety cabinet on ice.
- Place labeled 1.8 mL cryogenic vials in tube racks until ready to use. Immediately before use, place vials in the biosafety cabinet on ice.
- To prepare organoid fragments for cryopreservation, refer to steps B.4 - 11 of the PIS. Using the method outlined in step B.11 calculate the total volume required to transfer 800 organoid fragments per vial to be frozen (volume for 800 organoid fragments x # of vials). Add this total volume to a single 15 mL conical tube containing 1 mL of Advanced DMEM/F-12.
- Centrifuge tube at 290 x g for 5 minutes. Aspirate as much of the supernatant as possible without disturbing the pellet, leaving ~5 - 10 μL in the tube (the pellet is often not visible). Place tube on ice.
- Uncap 1.8 mL cryogenic vials on ice to minimize delays in subsequent steps.
- Gently resuspend pellet 5 - 8 times in 1 mL cold CryoStor® CS10.
- Add an additional 1 mL of cold CryoStor® CS10 for every vial to be cryopreserved and gently mix the suspension an additional 5 - 8 times by pipetting.
- Using a 1000 μL pipette, aliquot 1 mL of this CryoStor®/fragment suspension into labeled and cooled 1.8 mL cryogenic vials, mixing the total volume in the conical tube 1 - 2 times prior to dispensing into each tube to ensure even distribution of fragments.
- Immediately cap and transfer all cryogenic vials containing fragments into a controlled-rate cell freezing container. Place cell freezing container at -80°C.
- Cryogenic vials should be transferred to liquid nitrogen
storage after 24 - 48 hours of storage at -80°C.
NOTE: For a complete thawing protocol, refer to the Mouse Pancreatic Organoids PIS (Document #DX22148).
Request Pricing
Thank you for your interest in this product. Please provide us with your contact information and your local representative will contact you with a customized quote. Where appropriate, they can also assist you with a(n):
Estimated delivery time for your area
Product sample or exclusive offer
In-lab demonstration

