The Basic FACS on ALDEFLUOR™: The Quick Guide to Flow Cytometry
.
- Document # 28000
- Version 2.0.0
- Jan 2019
The ALDEFLUOR™ fluorescent reagent system has supported over 200 publications to date. This fast, antibody-free assay detects more than 80 types of viable stem, progenitor, and cancer precursor cells by measuring their activity levels of aldehyde dehydrogenase (ALDH) using a flow cytometer. Use this quick protocol to set up the flow cytometer for analyzing ALDEFLUOR™-stained ALDH bright (ALDHbr) cells. It assumes that all sample tubes (“SAMPLE”) and corresponding negative control tubes (“DEAB”) have been prepared.
Flow Cytometer Setup
Step 1
Create a Forward Scatter (FSC) vs. Side Scatter (SSC) dot plot.
- In setup mode, place your DEAB tube on the cytometer.
- Center the nucleated cell population within the FSC vs. SSC plot.
- Gate on all nucleated cells, excluding RBCs and debris (R1).
Optional:
If your sample contains < 90% viable cells, stain the cells with a viability dye (e.g. propidium iodide), create an FSC vs. viability stain dot plot gated on R1, and gate on cells within the first log decade on the viability stain axis.
Step 2
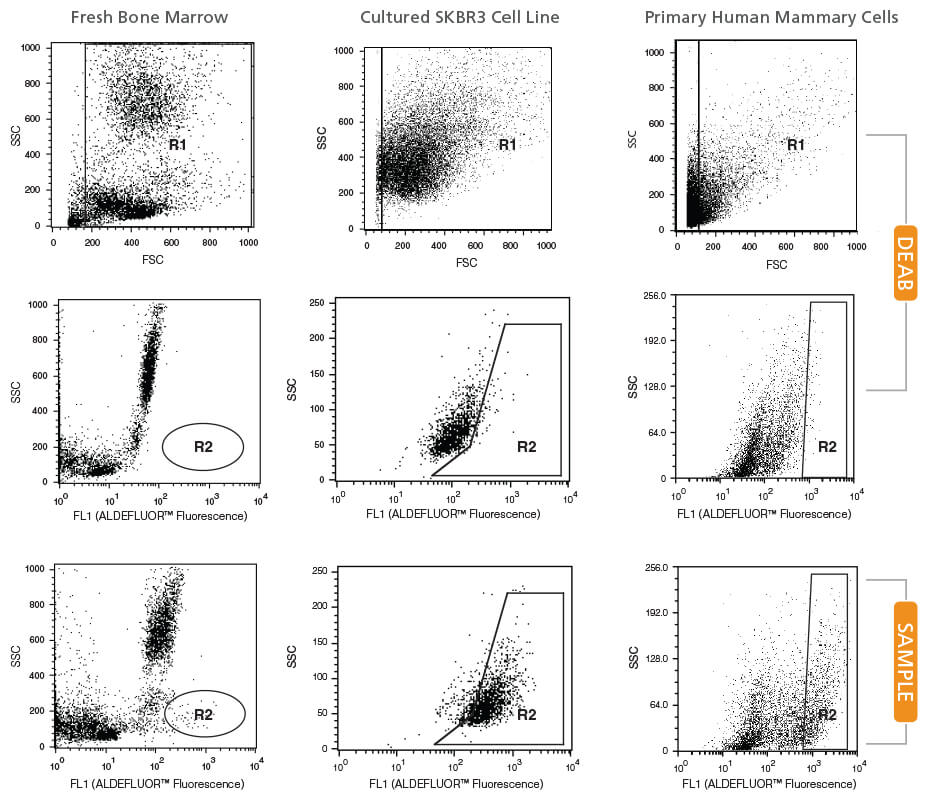
Create a Fluorescence Channel 1 (FL1*) vs. SSC dot plot, gated on R1.
- Adjust the FL1 photo-multiplier tube voltage. Line the rightmost edge of the stained DEAB control population with the second log decade on the FL1 axis.
- Remove the DEAB tube from the cytometer.
- Place the corresponding SAMPLE tube into the cytometer.
- Gate on the ALDHbr population (R2).
Note: Different ALDHbr cell types have different SSC properties and the gate should be set accordingly (see examples below). - Remove the SAMPLE tube.
*FL1 is assumed to correspond with the green fluorescence signal.
Data Acquisition
Change your cytometer from setup to active mode, and collect about 100,000 events in R1 for each DEAB and SAMPLE tube, without changing the instrument settings.
Watch a video overview of this procedure .
Request Pricing
Thank you for your interest in this product. Please provide us with your contact information and your local representative will contact you with a customized quote. Where appropriate, they can also assist you with a(n):
Estimated delivery time for your area
Product sample or exclusive offer
In-lab demonstration

